


 If you are ever faced with a period of extended power outages, wilderness living, or merely inaccessibility to a sewing machine, you may need to know a few tips and tricks for hand stitching.
Knowledge of hand stitching can come in handy, especially for mending damaged garments, bags, blankets, or other textile goods. It’s really easy to learn and a really easy skill to master, but so many people don’t give it a chance because they think it will take too long to get anything done or it will hurt their fingers, or it won’t look as good as sewing machine quality.
But the truth is, many people actually prefer to hand sew because of the control you have over the needle and thread. It takes some time and practice, but hand stitching can be every bit as lovely as machine stitching, if not more so. Plus, a lot of hand sewists would tell you that it’s a calming and therapeutic activity and can actually be quite enjoyable if you allow yourself the time to learn, especially for all of you quilters and needle-artists out there. You’ll find a freedom you never knew existed when you learn to hand stitch. You can take your designs and your skills to the next level without modern technology or computerization because you have the greatest computer ever created! Your very own brain!
First things first: There are some items you are going to need when you start learning to sew by hand:
- A needle (duh) – If you’re really in a pinch and you can’t find a proper needle, it is possible to fold a piece of very thin wire in half and get an (almost) acceptable mending needle. I wouldn’t recommend it for heavy duty work, or if you’re working on art stitches, but like I said… in a pinch.
- Thread – this can either be matching or contrasting to the fabric that you will be sewing, depending on your own personal style and design preferences. Sometimes contrasting thread can bring a lot of individuality to a hand-sewn garment, blanket or bag.
- Fabric in whatever prints or colors you find appealing.
- A pattern to work with so that you know how to properly cut the pieces out to get the shape that you want. Or you could always go the patchwork route and just keep stitching different pieces together until you find the shape that you want (This is a fun option of bags and quilts).
- Scissors.
- Straight pins.
- A leather, wooden or metal finger guard (also known as a thimble) – This is optional, but if you’re going to be sewing by hand for extended periods of time, the pads of your fingers will thank you for the investment.
Getting started
The first thing you need to do is lay out all of your materials so that you know where everything is. This will save you a lot of frustration, having to find things as you go along.
Next, lay out your fabric, pin and cut out the pattern, same as you would if you were going to use the sewing machine. Then, pin the appropriate pieces together (If you are working with a store-bought pattern, there should be instructions for these kinds of things, if you’re working from your imagination, then do whatever you want! The sky is the limit!)
When you have your pieces appropriately cut out and pinned together, you’re ready to start sewing.
Cut a length of thread (not too long or it will get tangled and knotted and you’ll get really frustrated and angry trying to deal with it). Thread it through the needle and knot the long end, leaving the tail (the shorter part hanging from the other side of the needle) unknotted.
Select the pieces of your fabric cut outs that you want to (or need to) start with. Beginning in a corner, or wherever you want the seam to start, pull the thread through once to ensure that it is properly secured by the knot.
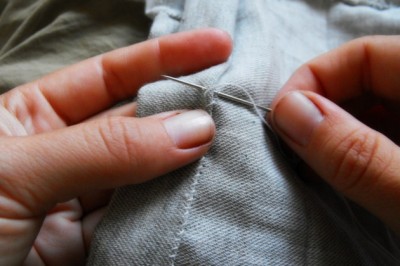
Next, stick just the tip of the needle through the fabric and bring it back through about a millimeter down the seam line (Sometimes it helps to draw a line that you want to seam to follow so that you can stay on track and keep your stitching straight). Weave the needle in and out of the fabric in this manner several times (as many as you can hold on the needle) and then pull the needle and thread all the way through (this is where the finger guard comes in handy – you’ll get tired of pushing the need through all those layers of fabric and the pads of your fingers will get sore). You should be left with what looks like a dashed line, probably an inch or so long. Continue along your seam line in this way until the pieces of your fabric are properly joined. (You can toy with how long you want your “dashes” to be, some people like them very tiny and close together, while others like them longer and more visible, especially if they are usually a contrasting thread. Be careful, though, not to make your stitches too long or the fabric will have a tendency to gather where you don’t want it to.
Tie off the end of the seam by running the needle under the last stitch, then pulling it through the loop created by the slack. (You’re basically tying a knot around the last stitch).
Carry on like this until you have all of your pieces joined to make your garment, or whatever you’re making. And that’s it! It goes by a lot more quickly than you think it will and it’s as easy as pie once you get the hang of it.
Hand stitching is a great alternative to machine sewing and can be fun and interesting. In fact, I love hand stitching when it comes to quilting design because I find that I have a better control over my quilting patterns than any machine has ever given me and I’m able to create beautiful, one of a kind works of art with just my own two hands.
It’s fun, it’s simple and it’s something to be proud of!
")


