


Image source: Myrtle Glen Farm
No homestead is truly complete without a cob oven. It is one of the iconic signs of rebellion and a step in the direction of freedom.
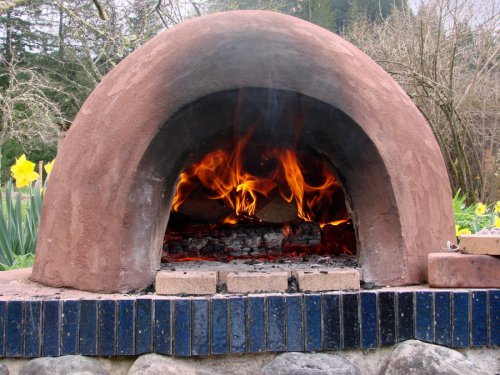
A cob oven is a baking chamber that reaches temperatures of up to 1,000 degrees Fahrenheit. It works like a battery, holding heat for more than 24 hours when constructed properly. With one load of wood you can cook pizza, bread, a turkey and even leave potatoes inside for baked potatoes – and do it all outside your home without warming the kitchen.
The cob oven goes back centuries, and it is not only efficient at cooking, but the taste cannot be replicated. For example, you might think it would dry out a turkey, but it rather traps the steam inside the cooker, making the food moist. Even better, it’s fairly inexpensive to construct.
Instructions vary on how to make them, but there are a few constants:
- A base
- Fire brick
- Clay (earth clay, fire clay)
- Sand
- Straw
- Water
A base can be made of just about anything secure. You could use the ground, but it would be difficult in which to work. A cinder block base is my option for cob ovens. They can be built inexpensively and to any size. I have seen bases made of wood, but you need to be careful to make it secure because there will be a few hundred pounds of cob on top.
New Solar Oven Is So Fast It’s Been Dubbed “Mother Nature’s Microwave”
Fire brick is used as the floor of the cob oven. Here’s how to do that: After building the base, put a layer of sand and level it out. Lightly place a layer of firebrick on the sand so it’s as level as possible. This firebrick will be able to handle the high heat and insulate the floor of your cob oven.
To get the needed inner shape, just make a mold using moist sand like you do at the beach. Cover the dome-shaped mold of sand with strips of wet newspaper.
Story continues below video
For the dome, you’ll need the following ingredients: clay, sand, straw and water. This is the hardest part, because depending on the clay source it may have sand in it. Buying a bag of fireclay makes it much easier, guaranteeing that it lacks the sand. Either way, make a mixture of sand, clay and water that allows you to make a ball, turn it into a snake, and then back to a ball. (The ratio will vary, but many people use 1 part clay to 2 or 3 parts sand.) It should hold its shape well and be on the dryer side. The less sand you use, the more cracks you will have later on. Once you think you have a mixture figured out, put all the ingredients onto a tarp and start adding straw while mashing by foot.
Now, shape a door, using brick and cob. It can be any shape, but just keep in mind the size is dependent on what size food you plan to stick in it. Get creative and alter the sand dome as you need, to make it all work.
Make softball-size portions of cob to place at the base of the sand mold, and then work your way up. Use consistent sizes to control the thickness of the cob wall. There should be 2-3 layers of cob, making it 4-6 inches thick. The thicker it is, the longer the heat will hold.
Let your new cob oven dry for a day or two before pulling out the sand mold. Make a small fire to help speed up drying time. You can keep it protected by making a lean-to over your stove, protecting it from rain and snow.
The great part about this is that the cob can be crushed and reused if you ever want to make changes.
Have you ever made a cob oven? What advice would you add? Share it in the section below:
Are You Prepared For Blackouts In Your Area? Read More Here.


