One of the best parts of any garden is the delight that comes from growing fresh herbs. While many types of herbs can be easily grown through the winter months, either in moderate outdoor climates or indoors on a sunny windowsill, there are also occasions where you will find yourself with the want and the need to preserve your herbs for year-round use. Imagine being able to enjoy a sultry cup of herbal tea on a chilly winter’s night, even though the herbs are months out of season.
There are several methods of preserving your herbs, and each method has its drawbacks and definite pluses. If you live in an area that tends to lean towards high levels of humidity, then air-drying your herbs is not necessarily the best choice. On the other hand, if you live in a more humid climate then it might mean that you can continually grow your herbs year-round due to the agreeable temperatures that you are living with.
Effective Herb Drying
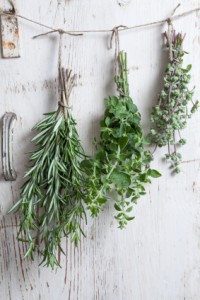
 Drying herbs is perhaps the easiest method of preserving many types of herbs. The part of the plant that is to be dried should simply be removed from the plant and exposed to continual warm and dry air in a well-ventilated space. A lot of people prefer to hang their herbs in bunches upside down in a sunny kitchen window, but it is not typically recommended to sun dry herbs because they can lose some of their bold flavors and attractive colors.
The ideal opportunity to harvest your herbs is to do so just before the flowers are set to open. Once the flowers have opened on plants that have bolted, the plants can often experience dramatic changes in flavors. Some may even become a little bit bitter, which is definitely not a desirable trait for food seasonings.
Collect your herbs in the morning so that you can avoid the summer afternoon wilting that so many plants are prone to. Rinse the herbs well in cold water, taking care not to damage the leaves. Shake the herbs carefully to remove excess moisture from them and carefully pick through your harvested herbs to eliminate parts of the clippings that are not in pristine shape. (You’ll also want to check for any insect stragglers while you are doing this!)
If you are fortunate enough to own a home dehydrator, then you’ll find it your best companion for drying out your herbs because it allows you the ability to carefully control the temperature and the right amount of circulating air. A dehydrator isn’t the only way to dry out your herbs, however. Setting your oven’s temperature to the lowest setting, which is typically around 125 degrees Fahrenheit, should give you the steady low heat that you need. The oven door can be propped open and a small fan can be aimed at the oven on a low setting in order to provide the air circulation that you need. This is likely to make your kitchen an uncomfortable zone for the duration of the time it takes to dry out the herbs, so you may want to consider opening up a few windows for a bit.
The herbs will be thoroughly dried out when they are crumbly to the touch. The dried leaves can be left whole and then crushed when you need them, or you can do a coarse crush on them before you package and store them away.
The dried herbs should be placed into airtight containers and stored in a dark, cool, and dry space in your home. This will help to protect the color of the herbs and also help to keep the intense flavor and fragrance from diminishing over time. Typically, dried herbs will be a lot more flavorful than fresh herbs, so it is recommended that you use a third of the called for amounts when following recipes and substituting dried herbs for fresh.
Survival Herb Bank Gives You Access To God’s Amazing Medical Chest!
There are generally two classifications of herbs when it comes to drying them out. There are the very tender-leafed herbs, and then there are the others. The herbs that are very tender have exceptionally high moisture content, and if you don’t dry them swiftly and thoroughly, you’ll wind up with a moldy situation. Some of the tender herbs include the following:
- Mint
- Tarragon
- Basil
- Oregano
The other set of herbs tend to be much sturdier and can withstand being air-dried include the following.
- Sage
- Parsley
- Rosemary
- Thyme
Some people have reported having good luck with drying their herbs out in their microwave ovens, but this can be risky because of the intense heat directed at the herbs. You may just wind up burning the leaves completely, or even setting them on fire!
No matter how you opt to dry them, you should ensure that they are always stored in the airtight sealed containers or even frozen in airtight plastic bags until they are needed.
Freezing Your Herbs
There are some herbs that simply work better when frozen than when dehydrated, but you’ll find that all of your types of herbs will tolerate being frozen without sacrificing much in the way of flavor, smell, or color. Herbs like tarragon, mint, chives, and basil tend to freeze very well when fresh cuttings are sealed in airtight freezer containers or bags. Keep in mind that while your frozen herbs will have the same flavor and smell as your fresh herbs, they won’t be suitable for garnishing your dishes because they’ll tend to be on the limp side.
Here are a few steps to quickly freeze your herbs.
- Rinse and clean your snipped herbs. Either pat them dry or consider spinning them in a salad spinner to remove excess moisture.
- Strip the leaves from the stems and place them flat on a cookie sheet.
- Pop the cookie sheet into the freezer for up to an hour.
Another really great suggestion is to freeze the herbs in blocks, using water and an ice tray. Simply fill the ice tray up halfway and put about a teaspoon of freshly chopped leaves into each little compartment. If you stick to a teaspoon or half a teaspoon then you’ll have exact measurements when you are cooking. Place the tray into the freezer and leave it overnight. The following day you can remove the ice tray and top it up with more water, this will ensure that your herbs are completely ensconced in the ice.
Once completely frozen, pop the cubes of herbs out and quickly place them into a freezer bag that is labeled and dated for easy recognition.
Herbal Infused Oil
Another great option with a gourmet twist is to freeze your herbs with a bit of olive or even truffle oil. Prepare the herbs much the same way when you are going to freeze them with water, but mix about half a cup of your preferred oil with three cups of chopped herbs. Once frozen, your herb cubes can be stored in freezer bags until you need them. They’d be a great addition to soups, stews, and even pasta dishes that call for garden-fresh herbs.
The herbal infused oil can also be stored in attractive glass oil bottles or glass jars. This method won’t keep the oil and herbs as fresh as the other methods, and it is advisable to enjoy your herb infused oil within three months. Place dried herbs into a sterilized glass container and carefully pour the warmed oil into the container. Seal tightly with a canning lid or with a cork and then place in a cool and dark spot in your home for up to a week. The oil should now be perfectly infused with the delicious fresh flavor of your herbs.
No matter the season, fresh herbs are a great addition to every dish. They also make a great gift for the gourmand in your life so be sure to share the bounty from your herb garden; it is sure to be thoroughly appreciated.
 Off The Grid News Better Ideas For Off The Grid Living


