


Photo by Steve Nubie
The fermentation of foods likely was accidentally discovered by our ancient ancestors. Certain foods that were left unattended or ignored actually developed unique properties that not only accented their flavor, but lent them unique preservation properties.
In this article, we will cover some basic foods that can be preserved by fermentation and a bit about the science of fermentation.
Fermentation 101
Fermentation occurs in a variety of ways. The most common is alcohol fermentation and lactic acid fermentation. Alcohol fermentation is common in beverages like beer, wine and spirits. It’s when sugar and yeasts interact to convert glucose into alcohol. The other primary type of fermentation (and there are others) is lactic acid fermentation. This is a common fermentation method with vegetables and certain dairy products like cheese, sour cream, cottage cheese and yogurt.
Vegetable Fermentation
We will focus on vegetable fermentation and review some standard recipes. This includes:
- Cabbage fermentation resulting in “sauerkraut.”
- Fermented garlic.
- Fermented radishes, which are very popular and common in Japan,
- Fermented carrot sticks,
- Korean Kimchi
The Concept
While alcohol production from fermentation depends largely on sugar, vegetable fermentation or lactose fermentation is often triggered by salt. Sea salt is the salt of choice, and it naturally draws liquid or water from vegetables to trigger the fermentation process.
One of the key steps in fermenting vegetables is to keep them submerged in their own juices, with sometimes the addition of a little water. Typically, a plate is placed over the immersed vegetables and a weight like a canning jar filled with water is placed on the plate to make sure everything stays submerged. This creates an anaerobic or no-oxygen environment which causes good bacteria to grow and ferment the food. The result is a release of carbon dioxide, which is often visible in the jar as the food ferments.
Make ‘Off-The-Grid’ Super Foods Just Like Grandma Made!
Once the process is complete, it’s best to put the fermented vegetables into cold storage, either in a root cellar or refrigerator, or you can process them in a hot water bath and store them in the pantry. I prefer the root cellar or refrigerator. I like my fermented vegetables cold.
Don’t Forget to Burp the Baby
When you ferment food in a sealed jar, the release of carbon dioxide will build up pressure. This will eventually cause the jar to leak or could even crack it. You should gently release the lid to allow the gas to escape at least once a day. I would suggest you take the jar outside, because in addition to the carbon dioxide there will be a strong aroma. This is particularly true for more aromatic vegetables like cabbage, garlic and radishes. I actually like the aroma, but my wife has told me otherwise on many occasions. Most fermented vegetables take about two weeks to ferment, so don’t forget to burp the jars or you might have a mess.
Basic Equipment
You really don’t need much to ferment vegetables. A cutting board and knife plus some Mason jars or a small crock. Most of the recipes call for 1-quart jars. If you use a crock you might need some plastic wrap to tightly cover the top to create an anaerobic environment (oxygen-free) in addition to the plate and weight to keep the vegetables submerged. The standard ingredients include sea salt and the vegetable you’re going to ferment. You can also mix vegetables if you like, just make sure they’re washed and cut up as the recipes indicate.
You also can add some seasonings. This is especially true with Kimchi, but caraway seeds are often an accompaniment to sauerkraut and I always add them during the fermentation process. Other accompaniments could include turmeric for fermented radishes and mustard seed or coriander for fermented carrots. That’s up to you. I’ve added peppercorns to fermented garlic cloves and they give the cloves a nice bite and finish.
Let’s Get Started
Here are some traditional fermented vegetable recipes that are easy to make with ingredients that are easy to grow, or bought at the grocery store.
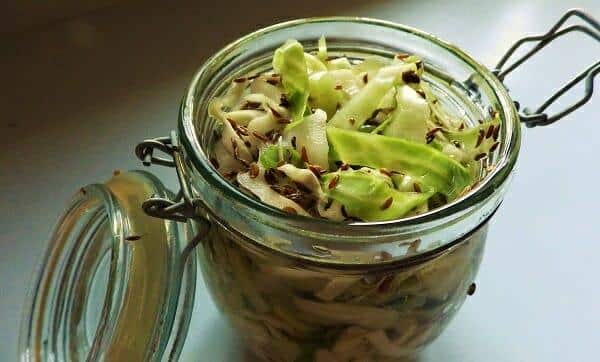
Sauerkraut
A traditional recipe popular across Europe, sauerkraut is fermented strips of cabbage.
INGREDIENTS
- 1 head of cabbage
- 3 tablespoons of salt
- 1/2 tablespoon of caraway seeds (optional)
- 1-quart Mason jar
DIRECTIONS
Chop the cabbage into thin shreds and place into a large bowl. Sprinkle with the salt, and using your hands incorporate the salt into the cabbage shreds. If you’re going to add caraway seeds, add them before you mix and blend the salt into the shreds. Press down and squeeze the cabbage as you go for about 10 minutes. I’ll often use a potato masher to really compress the cabbage. Slowly, the cabbage will release liquid. Press the cabbage down firmly into the jar and if you don’t see enough liquid covering the top, add a little water until the cabbage is immersed. You obviously don’t need a plate on top when using a canning jar, but make sure the lid is sealed tightly and that the jars have been sterilized.
Let the cabbage shreds sit at 60 to 70 degrees Fahrenheit for two weeks. If it’s cooler, it could take another week or two. Burp it every day and after two weeks, give it a taste. If it’s too salty you can always rinse it, but not too much or you’ll lose some of the flavor. When it’s done you can either process it in a boiling water bath for 10 minutes or keep it refrigerated or stored in a root cellar. Fermentation will help preserve the food, but processing or refrigeration is a good cautionary step.
Fermented Radishes

Photo by Steve Nubie
Fermented radishes are very popular in Japan and are often used as a palate cleanser between courses or a bite of particularly pungent fish like Mackerel.
INGREDIENTS
- 2 bunches of radishes
- 3 tablespoons of salt
- 4 cups of water
- Small crock or 1-quart Mason jar
- ½ teaspoon of turmeric and/or dill, mustard seeds, peppercorns (optional)
DIRECTIONS
Slice the radishes into thin slices and toss in a bowl with the salt and optional seasonings until they are thoroughly covered. Add the water and stir until salt is dissolved, and put into the jar or weigh down with a plate in the crock. If using a crock, cover the top with self-cling plastic wrap.
Ferment at 60 to 70 degrees Fahrenheit for 2 weeks. Taste to evaluate flavor and either process, cellar or refrigerate.
Fermented Garlic
Another personal favorite, this is a great way to have instant garlic on hand for recipes or you can chomp on them until someone tells you to stop.
INGREDIENTS
- One dozen heads of garlic
- Brine made from 1 quart of water and 2 tablespoons of sea salt
- 1-quart mason jar
- Herbs or seasoning of your choice. I like peppercorns but you can improvise
DIRECTIONS
Break the heads into cloves and peel. Fill a 1-quart Mason jar with the cloves up to 1 inch from the top. Add the seasonings and/or herbs and pour the brine into the jar. Ferment 3 to 4 weeks at 60 to 70 degrees Fahrenheit before processing or cellaring or refrigerating. As they sit in cold storage, the flavor will increase, so don’t eat them all at once.
Fermented Carrots
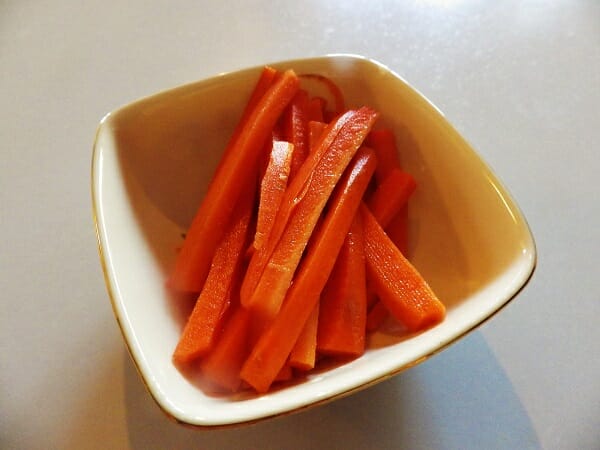
Photo by Steve Nubie
I have carrots coming out of my garden for months, and fermenting them is a great way to preserve them. They’re great as a garnish or on a relish tray and make a tasty snack as well.
INGREDIENTS
- 1 quart canning jar
- 1 quart of water
- 3 tablespoons of sea salt
- 3 pounds of carrots julienned into sticks
DIRECTIONS
Dissolve the salt in the quart of water. Julienne the carrots into thin sticks about 3 inches long. If you want to add any herbs or spices, put them into the bottom of the jar. Place the carrots in the Mason jar and pour the liquid over the top. Make sure you leave some headspace in the jar so the carrots are totally submerged. Ferment for 2 to 4 weeks at 60 to 70 degrees Fahrenheit. Taste as you go and when they suit your taste, put into cold storage. They’ll continue to develop their flavor while in storage.
Kimchi
Kimchi is the national dish of Korea, but variations are found across Asia. I lived and worked across Asia for two years studying Asian language, culture and cuisine. It was while I was in Seoul, Korea, that I discovered my unending love for Kimchi. This is a hot and spicy fermented dish made with Chinese or Napa Cabbage and slathered in a rich and robust mix of garlic, hot Chile peppers and other ingredients to create an inferno of flavor.
INGREDIENTS
Step 1
- 2 heads of Napa or Chinese cabbage
- 1 ¼ cups of sea salt
Step 2
- 1 tablespoon of fish sauce
- 6 green onions chopped
- Small onion minced very fine
- 3 cloves of garlic minced or mashed
- 2 tablespoons of sugar
- 1 teaspoon of ground or finely grated ginger
- 5 tablespoons of red pepper flakes
DIRECTIONS
This is a two-step process. The first thing you must do is cut the Napa cabbage into 2-inch squares. You then toss it with the 1 and ¼ cup of sea salt and place it into plastic bags or a large plastic bowl or crock and let it rest for 6 hours. This will tenderize the cabbage and soften it. You then rinse the cabbage and put it into a large plastic bowl.
You then combine all the ingredients left on the ingredient list and toss them together to blend. I wear rubber gloves from here on out for the rest of the process and jam it all into canning jars or your crock.
Make sure you crock is covered. Burp daily and in 2 weeks at 60 to 70 degrees Fahrenheit you’ll have wonderful Kimchi. Reduce the pepper flakes or increase depending on your tolerance for spice and heat. Store in cold storage and don’t eat it all at one sitting like I have sometimes done.
Fermenting Doesn’t Stop There
There are numerous recipes on the Internet for fermenting everything, from fruits to vegetables. The important thing is to understand and respect the concept and experiment as you go. Our ancient ancestors figured this out long ago, and it’s nice to know we can enjoy a taste of the distant past with something growing in our gardens today.
What advice would you add? Share it in the section below:


