 [1]
[1]Image source: kelliesfoodtoglow.com
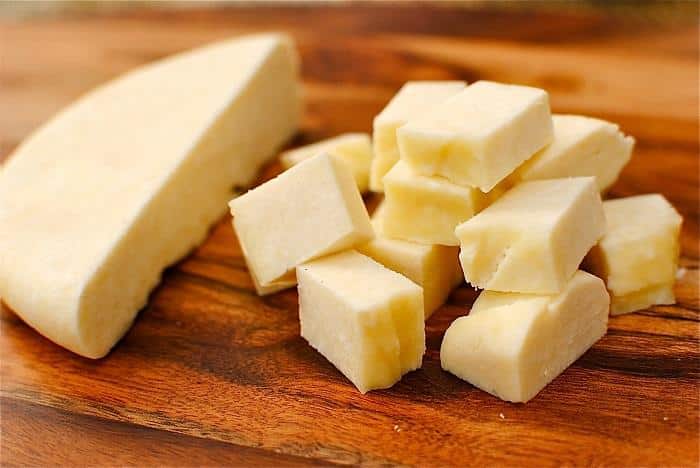
Making cheese at home from your own animals is a good way to use up all that milk you’ve got filling your refrigerator.
Even if you only have one cow giving you milk, you’ve still got six to eight gallons of milk to use every day – yes, EVERY DAY! – and no one can drink that much milk in a day. The good news is that you’ll still have plenty of milk to drink while you make butter and cheese out of the rest of the milk. If you make your own butter from the milk your goats or cow provides you, save the leftover liquid, since it makes a great addition to your cheese-making efforts.
You don’t need a lot of fancy, expensive equipment to make cheese at home, either. You probably have almost everything you need already in your kitchen. It is always best to have a set of equipment dedicated to JUST making cheese so you avoid odd colors, flavors or other contamination from other sources.
Equipment
Stainless steel or enamel pot. Due to the acid content that will be introduced in the process of making your cheese, you want to avoid chipped enamel, rusty spots and aluminum pots. This will introduce bitter flavors, and the aluminum can leech into your milk, causing a discoloration and bad taste to the resulting product. A double boiler can be used instead.
Ladle or slotted spoon. This will be used to dip the curds out of the remaining liquid.
Colander. This will be used to drain the whey from the curds to the desired firmness.
Cheesecloth. You will want the muslin or cotton-type cloth. It can be washed and used for a very long time before it wears out. Make sure you get your cheesecloth from a cheese-making supplier, since the stuff marketed as cheesecloth nowadays is not really suitable for draining your curds.
Thermometer. You can purchase a floating cheese thermometer if you choose. However, any thermometer that reads between 35 and 170 degrees (Fahrenheit) will work.
Discover How To Make Just About Anything … From Scratch! [2]
Long knife or thin, flat-bladed spatula. This will be used to cut the curds after the milk curdles. Any flat-bladed knife or spatula will work, so long as it is long enough to reach the bottom of your pot. If you are using an enamel pot, be careful not to scratch the enamel coating, since doing so would make your pot unsuitable for cheese-making.
Salt. You will want to use kosher, canning or any other non-iodized salt for seasoning your cheese. Any salt with iodine will impart a greenish color to your finished cheese.
 [3]
[3]Image source: leeners.com
Cultures. Cheese-making cultures basically “inoculate” your milk against bad bacteria that can cause illness or unexpected results in your finished product. Cultures fall into two different categories: Thermophilic and Mesophilic. These can be purchased as a freeze-dried powder. They are living organisms, so it is best if they are kept in the freezer between uses.
- Thermophilic means “heat loving.” Cheeses made with thermophilic cultures can tolerate higher temperatures. Mozzarella and yogurt are made with thermophilic cultures.
- Mesophilic means, obviously, “non-heat loving.” This is what most cheeses are made with that are not heated above 102 degrees. Farmer’s cheese, Paneer, queso fresco, cottage cheese, cultured buttermilk and sour cream, as well as others, are made from this culture.
Some kind of coagulant. This will cause the curds to form. Here are three options:
- Rennet. It is available in both liquid and tablet form from either a vegetable or animal base. Liquid rennet must be refrigerated, while tablet rennet is more stable at room temperature.
- Citric acid powder, vinegar or lemon juice. This is used to raise the acidity of the milk more quickly. If you make mozzarella with one of these additives, it will not have the beautiful stretch that is associated with that type of cheese. These are mainly used in making Ricotta cheese.
- Tartaric acid. This is used only in making Mascarpone cheese and gives it the thick, creamy texture.
Remember that milk straight from the cow or goat contains a lot more butter fat than the pasteurized milk you will get at the store. This will form richer tasting and larger curds for your cheese.
“Cheesemaking”: The Book You Need To Make Every Type You Crave [4]
The most basic of cheese-making recipes found online today leave out the addition of a culture to the cheese-making process because it is assumed that you will be using pasteurized, store-bought milk which has eliminated all of the “bad” bacteria that can be present in the milk. However, if you are using your own raw milk – whether you’ve pasteurized it yourself or not – you will need to add the cultures so that the lactose (milk sugar) is turned into lactic acid properly. If you want to make mozzarella or a “wheel” of cheese, those processes are more in depth and will require additional research. However, the following process will get you started for every cheese that you will make. The only differences will be the type of culture and the type of coagulant you will use to get your preferred dairy product. Let’s get to making that cheese!
Basic Steps to Making Soft Cheese
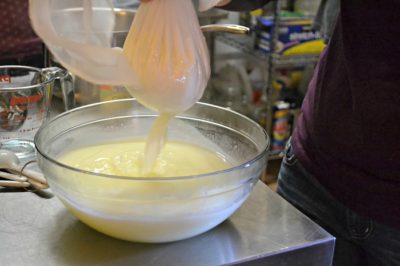
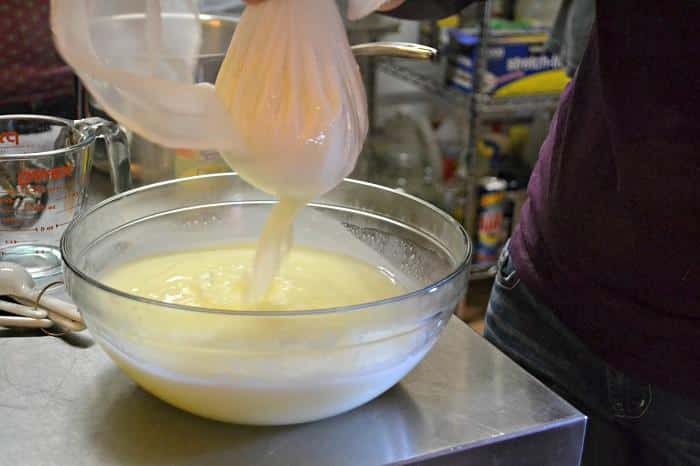
Heat the milk.
-
 [5]
[5]Image source: gracefullplate.com
Indirect heating is the best way to heat your milk to the proper temperature. (The proper temperature for most cheese is between 160 and 185 degrees, although it varies for each cheese.) However, a thick-bottomed pot can be used over direct heat. Heat the milk slowly over low heat for the best results.
- If indirect heating is not possible or when heating a large quantity of milk, you will want to stir the milk frequently. When the milk approaches the proper temperature, you will need to stir it constantly so that it doesn’t scorch. A minimum of scorching will ruin the flavor of the whole batch.
- When the milk reaches the final temperature, turn off the heat and continue with the rest of the process.
Add the starter culture and rennet.
- If you need to add culture to your unpasteurized raw milk, now is the time to do so.
- Sprinkle the powdered culture starter over the top of the heated milk to allow it to rehydrate for a few minutes before stirring it in thoroughly.
- Now, you will need to add either rennet or an acidic coagulant to make the curds form.
- If you are using lemon juice, let drops fall through the slotted spoon into the milk and then incorporate it with up and down movements of the spoon. Avoid stirring, as stirring will break up the fragile curds that are starting to form.
- If you are using citric acid powder or Tartaric acid, sprinkle it over the surface of the milk and incorporate it with up and down movements of the spoon. Again, avoid stirring so that the fragile curds aren’t broken up.
- Rennet causes the curds to be larger and firmer than the acidic coagulants. Follow the directions on the bottle or box for diluting. Add it to the milk with the up and down movements that was used for the acidic coagulants for the same reason.
Forming and draining the curd.
- Once the milk has heated and you have added the culture and coagulating agent of your choice, allow the milk to set. The longer the milk sets with those additives, the larger and firmer the curds will be. Do not allow it to set more than 30 minutes, as bacteria will grow the longer the mixture sets.
- Line your colander with a layer or two of cheesecloth and set over the sink or bowl, depending on if you are saving the whey.
- Once the curd has properly formed, use your long knife or spatula to cut through the resulting mass.
- Using the slotted spoon or ladle, dip the curds carefully into the cloth-lined colander.
 [6]When all of the curds have been transferred to the colander, lift the corners of the cheesecloth to form a bag. Carefully twist the pouch to force the whey out of the curds. You can tie the pouch up with a new shoelace or other string. At this time, if you want a milder cheese, you can wash the curds to remove more whey and cool the curds.
- Allow the compressed curds to drain for another 30 minutes before untying and breaking up the curd ball in a clean bowl.

Salting and storing your soft cheese.
- When the curds have been drained and broken up in a clean bowl, salt to taste. Add about one teaspoon of sea salt or cheese salt for each half pound of soft cheese. This will improve the flavor and extend the storage time of your cheese.
- Cover tightly in a storage container or wrap in plastic wrap and then foil. Store in the refrigerator until you are ready to use it. Fresh soft cheese will last between one and two weeks if kept tightly covered in the refrigerator.
And there you have it – you have made cheese from your own animals at home! For every gallon of milk, you can get one and a half to two pounds of cheese curds, depending on the butter fat content with which you start. The process may take a few hours, but the results are extremely tasty — and economical. And the leftover whey can be used in the garden or fed to your chickens.
Have you ever made your own cheese? What tips would you add? Share them in the section below:
Discover The Trick To Saving Thousands At The Grocery Store. Read More Here. [7]
 [8]
[8]