


Image source: Jenifer Jost
Learning how to make a funnel trap is an important skill, because you can use it on land and water, and in almost any terrain in the world. You can turn plastic bottles into funnel traps for minnows, rodents, toads, crayfish, and other small animals. You can also make larger funnels for muskrats and big fish.
In this article, I will specifically explain how I made a funnel trap out of an old tomato cage and discarded grapevine. This project inspired two recon missions into my husband’s garage and (oddly) a trip to Hobby Lobby to satisfy a hunch.
First, let’s go over the concepts.
The Basics Of Funnel Traps
A basic funnel trap is made of two cones. First, one large cone that holds prey until you remove it. Second, a smaller, open-ended cone that allows animals to enter the trap. The opening should be just a bit larger than the animal you plan to trap. Traps also must include a door you can open to remove the prey. Usually, the smaller cone is detachable from the larger cone, and serves as the door.
Some types of funnel traps are designed so animals physically cannot escape. A rodent cannot escape a bottle trap, for instance, because the plastic is too slippery for it to climb the inverted cone. Fish can physically escape a funnel trap, but their hard-wired behavior almost always prevents them from doing so. They follow a scent trail (bait) into the trap, but the shape of the funnel discourages them from finding the way back out. While a few fish luck their way out of it, they usually do not.
Materials To Use
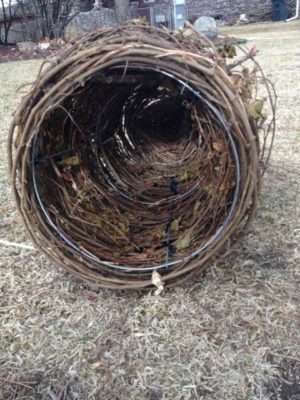
As I was preparing my yard for spring, I came across an old wire tomato cage and a pile of discarded grapevine. Those are a great combination for a funnel trap. The cage provides a framework, while the grapevine can be wrapped (not woven), around the cage, in very little time. The wrapping process took me about two hours, but weaving would have taken an entire day.
Because grapevine is so prolific, I cut it all the way to the ground every fall. It would have been much easier to manage had I used it when freshly cut. Because it had dried over the winter, the canes thicker than one quarter of an inch had to be wrangled, even after I soaked them in water for 30 hours.
Get Dependable Emergency Back Up Power
Wrapping The Grapevine Around The Tomato Cage
I started at the small end of the cage with the thinnest, most flexible, and least brittle canes. I used them as ties to bind the lower spokes of the tomato cage, then continued to wrap the vine until I reached the first rib.
At that point, I switched to the thicker vine, which was so unruly that I performed embarrassing wrestling moves in my yard before going on the first recon mission to my husband’s garage. After scoring a fistful of zip ties, I was able to twist and secure the grapevine around the cage.
Next, I bent the protruding wires from the small end of the basket over, and tucked them into the grapevine. Most of the vine was neatly wrapped, but there were a number of loose ends on the inside and outside, which I crudely wove into the erratic pattern.
At this point, my project looked like something sold at Hobby Lobby. I checked, and there are, indeed, small grapevine cones sold at Hobby Lobby for under $10 dollars per piece. Unfortunately, they are a bit too small for my purposes, or I’d be making one each for my besties.
Making The Funnel
The smaller cone, which is both a funnel and a door, takes three times as long to make as the larger cone, because you must create a framework for it. Start by making three rings of graduated diameters with vines. The first ring should be the same diameter as the opening of the larger cone. Make the second ring just a little bit larger than the animal you’re baiting, and the third ring in between the sizes of the first two.

Image source: Jenifer Jost
The vine ring in my hand in the photograph is the smallest ring. My trap is large enough to hold small-sized fish such as perch, bullheads, and brook trout, so I made the smallest ring accordingly.
Use sticks to create the spokes of the funnel. I was able to secure the sticks to the largest and smallest rings. However, I had to use temporary cloth ties to secure the middle ring. Once the framework was in place, I made the funnel by crudely weaving and wrapping the vines around the framework. Then I wove twine perpendicular to the spokes to help the funnel hold its shape in water.
The Finishing Touches
Most basket-type traps will not be heavy enough to sink in water. You can weigh it down with rocks, or, as I did, take another recon mission to your husband’s garage. This time, I found old fishing weights that I tied to the inside of the basket.
Attach the cones with whatever you have on hand. I’m using twine, but I have seen traps of this type that are secured with several small sticks.
Finally, you must bait the trap. I’m certain I will catch crayfish if I hang bacon on the inside. Otherwise, I might try a general approach by filling a small muslin bag with scraps and letting it float around on the inside.
Of course, you can make funnel traps without tomato cages, using only supplies found in the woods – vines, sticks and willow bark cordage, for instance. The result, though, is the same: a trapped animal, and sometimes, lunch.
(Editor’s note: the video below shows how to make a funnel trap in the woods.)


