 Print
Print

When I first moved into my off-grid cabin, no one had lived there for more than 10 years. However, the previous tenants did leave behind a couple hundred candles and cases of glass jars with no lids. I used candles and lanterns to get by that first winter and by spring there were two things I had in abundance: Empty jars and little burned candle stubs.
I decided to make some gifts for Mother’s Day that year, and I put my seemingly useless assets to work. I ended up with beautiful and unique gifts that cost literally nothing. There’s not a whole lot to it, but making candles is a great hobby. If you burn candles regularly or have beehives, then you’re halfway there. You also will need glass jars, cotton string and a pencil.
The first step to making these candles is to save up, and then clean, your leftover candle stubs. Take a sharp knife and slice the stub in half along the wick. Pull out the wick and cut the rest of the stub up into dime-sized pieces. You also can scrape off any parts of the candle that are burned or discolored.
If you have leftover jar candles with wax in the bottom, don’t try to cut it out using a knife. You risk shattering the jar if you do. All you need to do is put the jar in a double boiler for a few minutes until the wax is soft. Scrape it out with a spoon and let it dry again on parchment paper. Or you can make it into a liquid and pour it out. You might want to strain the wax if you pour it out. This can filter out the remnants of the wick and anything else that might be in there, like dead lady bugs or pet hair.
New Survival Energy Product Makes Every Window A Powerful Solar Charger
Once you have a lot of wax saved up, find yourself a nice glass jar with a wide mouth. You also can get more creative with the container, using old coffee mugs or small bowls. Just remember that it needs to be fireproof.
You will probably need more wax than you think, so be sure to save up plenty. If you have a jar in mind and want to fill it with the wax to be melted, you will need to have at least twice as much as the jar holds in dry wax.
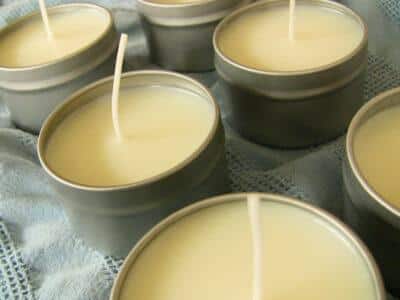
So now you’ve got tons of wax laying around waiting to be turned into candles. The first couple I made I did in a double boiler on the range top. After that, I used a double boiler on top of the woodstove. No matter where you are going to heat the wax, a double boiler is necessary. Put some water in a large pot and keep it at a simmer. Then take the wax and put it in a smaller container and place it in the water. The wax will take a while to melt and you will most likely need to add in wax as you go. Stir it once in a while, just to get the big chunks off the bottom.
While the wax is melting, you can get the rest of the setup ready. Take your jar and clean it inside and out. Once the wax goes in, any dirt or stains on the glass will stand out in contrast, unless you’re lucky enough to have a stain the same color as the wax you’re using.
New Mini Pocket Power Plus Can Charge All Your Electronics — And Jump Start Your Car!
Now it’s time to prepare the wick. Take the string and tie it tightly around the middle of the pencil. Cut the string to length so that it hangs just above the bottom of the jar. If the string is coming off of a spool or has a lot waviness to it, just dampen the string with a little water to make it hang as straight as possible. Holding the pencil horizontally across the lip of the container, center the string in the middle of the jar as best you can. If you want, tape the pencil to the jar so that it doesn’t shift. If the wick is too close to the sides of the jar, you run the risk of the glass cracking when the candle is lit. This also can potentially cause hot wax to shoot all over the area.
Once the wax is uniformly melted, slowly pour it into the jar. If you’re using a really large jar, you can even make layers of different colors at this point, letting each color dry before adding the next layer. Once the wax cools, it will most likely leave a hole in the center of the candle because it has shrunk during the cooling process. So during the initial pour, don’t fill the jar all the way to the top. Leave a little room so that you can re-melt the leftover wax and fill in the hole in order to have a nice smooth top.
With a large jar you may have to wait a day or two until the wax is completely hardened. But you can cut the wick from the pencil as soon as you’re sure it won’t fall into the liquid wax and disappear.
This is a great way to recycle what would otherwise be junk, and there is an almost endless variety of candles that you can make. You can add some essential oils or leftover scented wax for a subtle aroma, or make coordinated stripes with colored wax. No matter what your finished product looks like, it is a great way to spend an evening getting rid of garbage by turning it into something useful.
Have you ever made candles from recycled wax? What advice would you give?