 Print
Print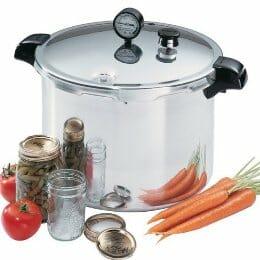
 If used following the manufacturer’s safety rules, pressure canners can be both safe and economical. Pressure canning is for preserving foods with low acid contents, and has been used for decades. All canners should have a removable rack to place jars on to allow the water to circulate around the jars, an automatic vent/cover lock, a steam vent and a safety vent. They may also have a weighted gauge, for indicating and regulating pressure or dial gauge for indicating the pressure. They are generally deep enough for one layer of quart jars or two layers of pint jars or smaller, although there is a model available that will hold two layers of quart jars.
Why Pressure Canning?
Canning your own food gives a sense of accomplishment and satisfaction. The guesswork is taken out of pressure canning when the guidelines for operating a pressure canner are followed exactly; scientifically tested and approved recipes are followed; and high quality equipment, supplies, and foods are used. Low acid foods require processing at much higher temperatures than can be achieved in water bath canning. Using a pressure canner to kill harmful bacteria, such as botulism, ensures the safety of your preserved foods. Foods like dairy products, red meats, seafood, poultry, and fresh vegetables (except for those varieties of high-acid tomatoes), are low acid foods;  this means they have a pH (acidity) level of 4.6 or higher. These foods need to be processed at 240 to 250 degrees F for a specific amount of time in order to kill the harmful bacteria that may be present in your foods. Water boils at 212 degrees F and will not get any hotter, so this makes water bath processing out of the question. To reach and sustain these temperatures, you must process using steam under pressure. (Note: steam canners can’t reach the required temperatures for low acid foods either, so should only be used with water bath canning recipes.) Pressure canners put under 10 to 15 pounds of pressure can reach the right temperatures and will help you provide safe, home-canned, low-acid foods for your family.
If your pressure canner has a dial gauge, the accuracy of your gauge needs to be checked each year before you start canning. Some University Extension Service offices will check your gauge. Or check with your canner’s manufacturer to see if they will check your gauge for you. Weighted gauges will not require checking, as they are always accurate.
Steps for Successful Pressure Canning:
(Read through before you begin.)
- Center canner over the burner. When you have enough jars filled and ready, place the rack and 2 to 3 inches of water in the canner. For hot packed foods you can bring water to 180 degrees F. ahead, being careful not to boil water or heat it long enough for the depth to decrease.
- Place filled jars with lids and rings fitted snuggly on rack in canner, using a jar-lifting tool. Lift around the neck of the jar below the lid and ring securing it snuggly before lifting. Keep jars upright at all times; tilting can cause food to seep into the sealing area of the lid.
- Securely fasten canner lid. Leave the petcock open or the weight off the vent port.
- Turn up heat to highest temperature. Bring to a boil and continue heating on high until steam flows freely in a funnel-shape from petcock or vent port. While maintaining the high heat, let the steam flow continually for 10 minutes.
- After venting the canner, place the weighted gauge on the vent port, or close the petcock. It will take 3 to 5 minutes to pressurize.
- For canners with dial gauges start timing the process when the gauge reaches the right pressure reading. For canners without dial gauges, start timing when the weighted gauge starts rocking or wiggling.
- Heat needs to be regulated to maintain constantly at, or slightly higher, than the proper pressure. There are two types of weighted gauges; one should rock 2 to 3 times per minute, the other will rock slowly throughout the process – check manufacturers directions for your pressure canner. *If at any time the pressure goes below the recommended amount, you will need to raise the pressure to the correct amount, then start timing the process again, from the beginning for the whole time required. This is very important for the safety of your food.
- When the processing time is over, turn off the heat and let the canner cool naturally. (While it is cooling it is also releasing pressure.) Don’t force the cooling process; this may cause food to spoil. Cooling the canner under cool running water or opening the petcock before the canner is fully depressurized are ways of forcing the cooling process. These may cause loss of liquid from jars and seal failure. Also, forced cooling may warp the lid of your canner.
- When fully depressurized, remove the weight from vent port or open the petcock. Wait two minutes, for your safety, before opening the lid. Lift lid with the underside facing away from you. This will keep the steam from blowing into your face and burning your face.
- Using a jar lifter, take the jars out one at a time, carefully, so that they do not tilt. Set them on a towel or cooling rack with an inch between them so that they do not hit against one another. Avoid placing jars on cold surfaces or in drafty places to cool.
- Sit undisturbed 12 to 24 hours. Don’t tighten the rings or push the center of the lids while they are cooling; wait until they are completely cooled.
- Remove rings. Any unsealed jars should be placed in the refrigerator and used first.
- Wash jars and lids to remove any residue. Label jars and store in cool dry place out of direct sunlight.
- Wash and dry completely canner, lid, gasket and any parts that are made to be removed.
There are many reasons for following these instructions, and it’s not just because we’re being obsessive about safety to the exclusion of common sense. For example, it’s very important that you allow your pressure canner to vent at full force for 10 minutes BEFORE putting the pressure regulator over the vent hole. When you vent the canner, you are forcing air not only out of the canner, but out of the jars as well. If you do not push the air out of the jars, proper pressure will not be maintained, and you will not get the temperatures you need to kill the Clostridium botulinum spores. Each step of the process has the same reasoning behind it. Skimping on any area of the canning process is setting yourself up for possible illness (and death) from spoiled food.
Canning is an excellent way to preserve your harvest. Using the proper procedures will ensure that you have healthy food for your family no matter what happens.
______________________________________________________