Garlic is one of the easiest things you can grow in your garden, regardless of your gardening background or years of growing experience. It’s virtually maintenance free and even folks with so-called “brown thumbs” can grow it with great success. (FYI – I don’t believe in brown thumbs.) Garlic is a beautiful and functional plant – almost everyone loves the unique flavor.
Garlic is also good for you. Researchers have concluded that a diet rich in garlic can help you reduce your chance of heart disease, may lower your cholesterol, and can help you maintain a healthy blood pressure.
One of the best things about growing garlic is that you can grow enough garlic in just one season to store and use for an entire year. How many plants can you say that about? If you’re going to grow garlic this season, you’ll need to get it in the ground soon … very soon. With that in mind, we’ve gathered together our very best tips for growing garlic at home.
Garlic should be planted in the fall when temperatures begin to drastically cool down. For most of us, that means somewhere between early October and mid-November. The key is not planting too early when temperatures are still hot, but also not waiting too long. You’ll want to make sure to get your garlic in the ground before the first hard freeze. Otherwise, the ground may be too hard for planting.
Step One: Pick a good location for your garlic.
Garlic grows best in full sun, but it can still grow well in partial shade. It also likes well-drained, rich and organic soil. So keep these two factors in mind when picking the location for your garlic bed. Raised beds are a great option for growing garlic. You can also grow garlic in containers if you are a patio gardener or have limited space. Just make sure you use containers that drain water well.
Step Two: Plant your cloves.
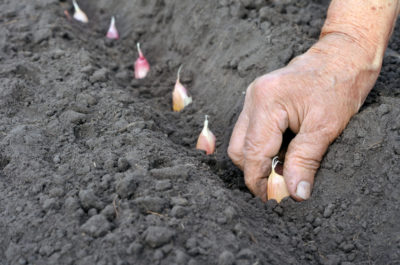
To plant garlic, you simply put your garlic cloves (the small sections of the garlic head or bulb) in the ground. Each clove you plant will grow into a new head of garlic. Before planting your garlic cloves, it is recommended that you soak them in a jar of water for a few hours. Do not peel the cloves. These steps will help protect your crop from fungal diseases.
Simple Recipes for Tinctures, Teas, Salves, Tonics, and Syrups
Plant the garlic cloves with the flat end down and the pointed tip up. Plant the cloves approximately 2 inches below the soil line. Space your cloves about 6-8 inches apart. You can plant them closer together if you are using a container or have limited space, but your heads of garlic will not grow to be as large.
Step Three: Perform basic garlic maintenance to get your crop off to a good start.
Remember we told you that garlic is easy to grow? Well, that’s true, but that doesn’t mean your garlic plants won’t need a little bit of TLC along the way. A few easy maintenance chores can really help your garlic grow into big, healthy bulbs:
- Keep weeds and grass to a minimum in the garlic bed. Allowing them to take over the bed will choke out your garlic. Pull weeds and grass as needed.
- Place a layer of organic mulch (straw, dried grass clippings or shredded leaves) on your garlic bed after planting. This helps keep moisture in and pests out.
- Water your garlic bed or containers after planting. The plants will need approximately 1 inch of water each week in the autumn and early winter.
Step Four: Kick back and relax until spring.
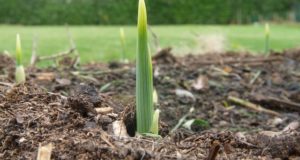
Garlic shoots will begin to emerge in approximately 4-8 weeks, depending on the temperatures where you live. Don’t panic if your garlic seems to stop growing during cold weather. This is a normal process. Garlic plants go dormant for a few months, especially in the colder winter months. Your garlic will start growing again when warm temperatures return in the early spring.
Watering your garlic plants is not typically needed during the winter dormancy period. During the winter, I let Mother Nature water my plants for me and I no longer water them by hand, unless we have a really long dry period.
Step Five: Perform these easy maintenance tips in the spring.
- Start watering your garlic plants again when growth resumes. They will need approximately 1 inch of water each week during the spring growth periods.
- Stop watering your garlic plants by hand around the first of June. This will force your garlic bulbs to be larger and firmer.
- Fertilize your garlic with an organic, liquid fertilizer like ProtoGrow every 2-3 weeks starting March 1. (You may want to adjust that date if spring arrives late to your neck of the woods.) Continue feeding them every 3 weeks until the end of May, or mid-June for cooler climates.
Step Six: Remove garlic scapes – but don’t throw them away!
Sometime around late May to mid June, your garlic will send up a garlic scape. Garlic scapes are flowery tops and can be wildly varied. Sometimes they are long and spiky, and sometimes they are curly or thin. These scapes should be removed once you notice them. This will force the garlic plants to keep growing into larger, more mature bulbs.
Don’t throw your garlic scapes away. They are edible and are simply delicious. You can add them to soups and dips, use them in stir-fry, or put them in just about any recipe where you like a little unique garlic flavor. I love to grill them or put them in homemade hummus. Many cooks like garlic scapes more than regular garlic and regard them as a delicacy!
Step Seven: Harvest and dry your garlic.
Depending on your climate, your garlic will be ready to harvest between late June to late July. You will know it is time to harvest when the leaves begin to turn a yellow-brown color and begin to dry up.
Carefully dig up each individual garlic bulb. Do not yank or pull them as this can break the stalk away from the bulb – which can lead to your garlic rotting before it has time to dry.
Your garlic needs to cure and dry before you can use it in the kitchen. Bundle the garlic into groups of 5-10 bulbs, with the stalks still attached. Tie them together and hang them in a dark, dry area. Allow them to cure for approximately 6 weeks. I dry my bulbs in the garage – but a warning … my garage has a very garlicky smell while the plants are drying.
One your garlic is completely dry, cut off the stalk and carefully trim away the roots. Leave a few inches of stalk above each bulb if you plan to store the garlic in containers. If you prefer to braid your garlic into traditional garlic braids, you’ll need to leave more of the stalk intact. Store your garlic in a cool and dry area. It should last you for many months if stored correctly.
Remember: Now is the perfect time to purchase your garlic and get it planted for most climates. Don’t wait until the ground is frozen!
 Off The Grid News Better Ideas For Off The Grid Living


