Say you’re in a survival scenario, and you’ve already accomplished the tasks of finding water, building a shelter, and starting a fire. Your next priority will be to gather food. You’ve found plenty of edible berries and roots, but you are going to need more calories than they can provide if you want to survive: you’re going to need meat. Knowing how to build survival traps can greatly assist you in your quest for extra food in the wilderness.
You can’t exhaust yourself walking through the woods with a sharp stick, and you probably wouldn’t have any luck anyway. You need to conserve energy and still have an efficient means to gather food. Snares are the answer; a dozen snares allow you to hunt in a dozen different areas at the same time. While you’re sleeping or working, the snares are hunting.
Before you start to build survival traps, you’ll have to take some basic considerations. Knowing your game is important: where they eat, when they move, and what water source they use. Try to leave as little scent as possible. Cover your hands if you can when you handle the snare, and avoid getting sweat or saliva anywhere in the area.
Setting up random snares will not be the most effective means of catching game. When you build survival traps, you need to look for animal signs, such as paths, droppings, and dens. If you set up snares along game paths and in front of dens, then it will be a surefire way to increase your odds. In addition, you can add some kind of bait to nearly guarantee that you’ll eat tonight.
An Outdoorsman’s Guide to Shelters, Tools, Weapons, Tracking, Survival, and More!
You can also use sticks and twigs to funnel your game to your snare. A knowledgeable hunter can do this easily using fallen branches, and it looks more natural than planting twigs in the ground.
Also, I mentioned adding bait; this will likely double your chances for game. For bait, you can use things like MRE peanut butter or even sugar or salt packets. You want to lure the animal to the snare, so drop little bits along a small path to your trap, letting the animal get a taste for your bait and let its guard down. Then, you should leave the majority with your trap. After you catch your first animal, you’ll have a whole new source of bait as you continue to build survival traps.

The first trap to learn is the basic snare.
Basic Snare
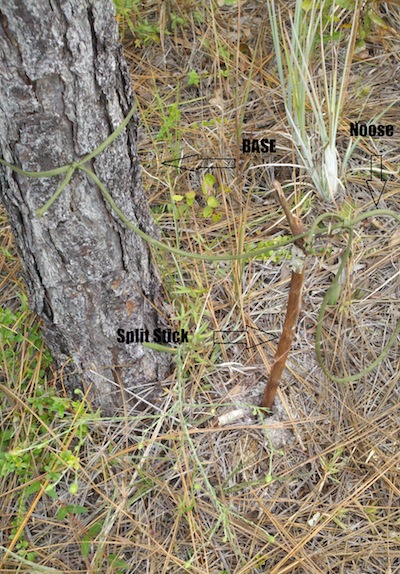
The first snare you can learn is a very basic snare. It requires a length of cordage, preferably wire, but paracord works well and is likely to be in your bug-out bag anyway. You should use a split stick to support the snare and allow the animal to walk into it. Lastly, you’ll need a tree or something else heavy so that the animal can’t pull it away.
Tie the noose and attach the other end to a tree. Next, make sure that you place the split stick into the ground and ensure it’s deep enough so that it will not fall over or be easily pulled out. Set the noose over the split stick to prop it up. The noose needs to be strong enough to support a five-to-ten-pound animal. The length for the cord needs to be eighteen to twenty-four inches for animals this size.
The goal is for the animal to walk through the trap at about chest height, the noose tightening as they pull it. Any struggling and fighting the animal does will only tighten the noose. It’s best for you to set the trap at the base of a den, catching the animal coming or going. You should be prepared to encounter an angry animal when you check the trap and have a weapon (like a heavy stick or knife) to finish it off.
Trigger Spring Trap

You’ll need a two-piece trigger system for this trap.
The second option you can employ to build survival traps is to construct a trigger spring trap. This is more complicated than your basic snare.
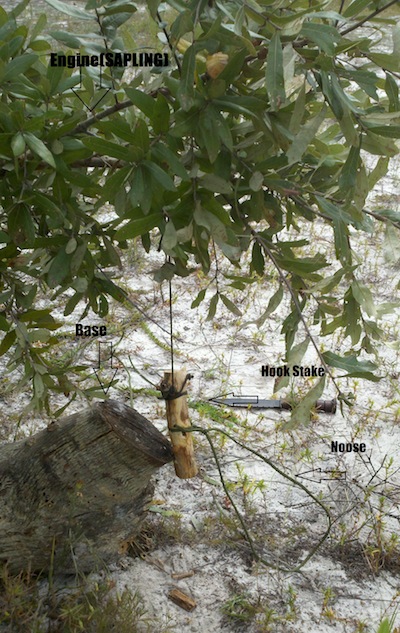
You’ll need a small but strong sapling to act as your engine. You’ll also need a two-piece trigger system for this trap. There are a few different ways to do this. In the first you have two pieces of wood, each with a hook carved into it, one at the top of your base stake and one at the bottom of your hook stake. The second is the catch method, where your base is something heavy enough that it will hold your hook stake. The third is the primitive Y-stick method, which is just two Y-shaped sticks holding each other in place.
You will tie your noose and the line from your sapling to your hook stake. Sharpen the bottom of your base stake and drive it into the ground. Make sure it’s tight enough in the ground that the sapling won’t pull it out. Next, tie your line from your sapling to your hook stake. I suggest carving a notch into the hook stake to make sure your line doesn’t slip off. You need to carve a similar notch for the noose as well.
After this, you will then bend the sapling down and connect the hook stake to the base stake, making sure the noose is open and at chest height for the animal you’re trying to capture. You should use twigs if necessary to open the noose.

This is an easy trap that requires no cordage, although a pocketknife may be needed to carve the notches and sharpen a few ends.
Figure-Four Deadfall Trap
This is an easy trap that requires no cordage, although you may need a pocketknife to carve the notches and sharpen a few ends. The figure-four trap relies on a heavy object such as a log or rock to smash your prey.
The heavy weight of the log or rock rests on a stick running diagonal. The diagonal stick rests on the base stick, using a notch carved in the middle of the diagonal stick to hold it in place. You want the top of the base stick to be carved into a thin, flat end. You will have to carve the end of the diagonal stick into the same flat end, and it rests in a notch carved into your bait stick.
Now, you must lay these on the ground and see where the base stick and the bait stick meet. Mark the place where they meet on each stick. Next, you’ll need to carve a notch on both sticks where you marked. The notches need to be big enough to hold the sticks together.
Now, you’ll have to put it together and slowly rest the log or rock on the diagonal stick. (It is usually easiest to apply your bait before it is fully assembled.) When the animal trips the bait stick, the entire thing will collapse, killing or disabling it.
These are just a few of the most basic techniques that you can use to build survival traps in an emergency situation. Make sure that you use these as a starting point, and once you have mastered making them, you can move on to more advanced designs.
You may also be interested in How To Build A Box Rabbit Trap!
Editor’s note: This article is for informational purposes only. Please follow all local and state ordinances regarding the snaring and trapping of animals.
©2018 Off the Grid News
 Off The Grid News Better Ideas For Off The Grid Living


