Read part 2 in this series here.
Of all the survival equipment available, the most useful and most necessary is a good knife. Knives allow you to cut tree branches to make shelter, prepare firewood to keep you warm, hunt, prepare what you get from your hunt and a host of other necessary tasks. If you only have one tool with you at all times, it has to be a knife.
Most of us buy our knives at a store. There’s nothing wrong with that, as there are a large number of quality knife manufacturers around, offering an amazing number of knife models. You can buy pretty much any style of knife you want, in just about any size and manufactured to just about any quality level. Even so, it can be nice to make your own.
The biggest problem in making a knife is that good knives are forged, rather than stamped. That means that the blade is shaped and the edge thinned by hammering it while it is heated, rather than just cutting it out. Unless you have the capability of forging, you are limited by the steel you can get.
We’re going to get around that by starting out with steel that’s already been forged. You can’t make a good quality knife, without having good quality steel to start with.
Start with Good Steel
More than anything, the key to making a good knife is starting out with good steel. Ideally, a knife blade needs to be hard enough to sharpen well and maintain an edge, while not being so hard that it chips easily. That’s a hard balance to reach.
Most modern knives are made of stainless steel. While this provides a hard blade that won’t rust, stainless steel blades aren’t as hard as high carbon steel. Therefore, they don’t hold an edge as well as high carbon steel knives do. Some newer types of stainless steel have a higher carbon percentage, more closely matching the molecular structure of high carbon steel knives. They maintain their flexibility by adding a high percentage of molybdenum to the steel as well.
If you try and make a knife out of cold rolled steel, the type you can buy at a hardware store or steel supply, you’re going to be very disappointed. This is soft steel, so it won’t hold an edge at all. While you may be able to sharpen it, the edge will dull extremely easily.
The best and easiest places to get good steel for making knives is from tools; specifically from files. You can also make very thin knives out of reciprocating saw (sawzall) blades as well. Files are made of steel that will hold an edge well, as it is necessary for the file to not become damaged when used to shape metal. Old files are often made of high carbon steel. You can tell, because they will rust.
If you want to make a wider knife than you can make with a standard flat file (which is only about 3/4” wide) you can use horseshoeing rasps. Like other files, these are made of a high grade, hardened steel, which will hold an edge well. Horse shoeing rasps are available at farm supply stores, as well as a number of online suppliers.
Grinding Your Knife Blade
The first part of turning a rasp or file into a knife blade is to draw out the silhouette of the knife on the file itself. You might want to make a cardboard pattern to use for this, rather than trying to draw it freehand. The bumps on the side of the file make it hard to draw freehand; by drawing it out first on a piece of cardboard, you can adjust the design of your knife to what you want.
I’m not going to talk about knife blade designs at this point, as you can easily find many different ideas, simply by looking around. I would recommend starting out with fairly simple designs, not something with a gut hook or other difficult-to-grind feature.
It is always best to make your knives with a full tang, extending the full length of the handle. Knives with shorter tangs tend to break when pressure is put on them. There’s no sense going to all the trouble of making yourself a knife, only to have it break.
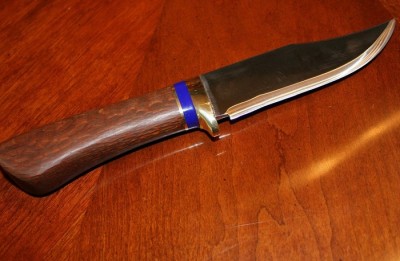
This is somewhat of an unusual knife profile, being a drop-point, with an indentation between the handle and blade.
That indentation was put there for the thumb and forefinger, when using the knife for delicate work.
The rounded area at the file’s tang end will have a hole drilled into it, turning it into a ring.
We are going to grind the knife blade to shape, rather than forging it. The steel of the file has already been forged and hardened. If we are careful not to lose the temper in the steel, we can avoid the problem of having to re-temper it. Start by grinding the profile of the knife to match the outline you have drawn on it, using a bench grinder. Before grinding, ensure that the rest on the grinder is set exactly perpendicular to the face of the grinding wheel.
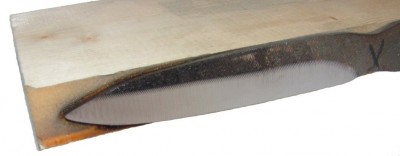
To grind the taper on the blade, you will need something to hold the knife blade at the correct angle. This is easily accomplished by cutting a piece of wood to the angle that you desire. For the knife below, I cut a five degree angle on the edge of the wood block, so that my knife blade would have a 10-degree angle. This caused the ground portion of this blade to be 7/16” wide. The block was longer than the knife blank, so that it could be attached along its entire length. This is necessary, especially when grinding the second side, to prevent the knife from coming off.
Depending upon the knife you are making and the width of the blade, you may want to change the angle. Unless you are good at trigonometry, the easiest way to figure out the angle for your blade is to draw various angles on a sheet of paper and measure how far back the blade’s taper goes for the thickness of your knife blank.

Knife blade attached to the angled side of the block. The facing side has been ground all the way, but the reverse side has not been.
The knife blade needs to be attached to the block. There are several ways of doing this, such as clamping or gluing rare earth magnets to the face of the block. It’s not clear in the photo, but I used double-sided masking tape for this.
Before attaching the blade to the support block, make a line down the center of its thickness. This will provide you with a gauge line for knowing when you are approaching the halfway point in grinding.
You can grind a knife blade with either a belt sander or a bench grinder. The belt sander will give a flat taper to the side of the knife, while the bench grinder will make it hollow ground. A six-inch bench grinder won’t work as well as an eight-inch one, as the curvature of the wheel on a six-inch bench grinder will make for a very severe hollow grind.
Grinding a knife blade takes a light touch. You want to take material off the blade along the entire edge in one stroke; working your way from the handle end to the point. Maintain consistent light even pressure along the entire length of the stroke, not allowing the knife blade and support block to tip in any direction. Continue grinding in successive passes until you reach the halfway point.
A couple of precautions on this: Don’t try to grind just one area of the blade at a time. You will end up with a blade that is wavy and inconsistent. If you need to work on one area to catch up with the rest of the blade, make a few passes through that area and then go back to full length passes. Be careful as you don’t want to heat up the knife blade while grinding it. The very act of grinding it will produce a lot of heat, so you’ll need to pause between strokes to allow it to cool. If the metal turns blue while grinding, you’ve overheated it, losing the temper. If you want to, you can dip the knife blade and block in water between passes to cool it.
Once the knife is ground just shy of halfway through, remove it from the block and turn it over, so that the other face of the knife blank is visible. Repeat the grinding process on this side of the knife, to make it match the first side. Be especially careful about not overheating the tip; as it thins, it will overheat much easier. Stop just short of sharpening the knife blade, as you will put the edge on the knife with a honing stone.
Many knife designs, such as this drop-point, are partially ground on the back edge of the knife, making the point sharper. This is accomplished in the same way as grinding the cutting edge, without grinding the metal all the way down to the middle of the blank.
Editor’s note: This is part one in a two-part series.
Sign up for Off The Grid News’ weekly email and stay informed about the issues important to you
 Off The Grid News Better Ideas For Off The Grid Living


