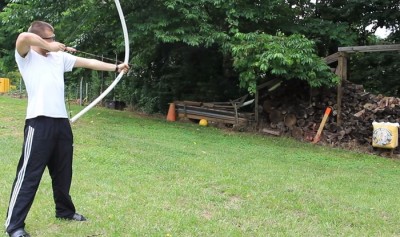
The bow is an amazing weapon. Of all the weapons which have been handed down through the centuries, the bow is one of the few ancient weapons that are still in use today. While we don’t see armies taking to the field armed with bows these days, there might be times when using a bow would make more sense than using a rifle. If you want to hunt silently, the bow is the way to go.
In the case of a major disaster with no access to ammunition, it would be natural to revert to the bow for hunting and defense. While shooting a bow accurately requires more practice than shooting a gun, and the range is more limited, it is still a formidable weapon. We should all know how to use a bow as part of our survival training.
Bows were traditionally made of wood, and you can still find some that are made of wood today. In a survival situation, you may want to make a bow out of wood. However, there is a modern material that is excellent for bow making. PVC pipe is not as attractive as wood, but it can be highly effective.

PVC pipe is inexpensive, readily available and easy to use. It also contains potential energy when bent, making it an excellent bow making material. You can mold it using nothing more than your hands and a heat source. On the off chance that you make a mistake forming it, it’s really not a problem. All you have to do is reheat it and form it again. Once cooled, it will hold the new shape, while maintaining its combination of flexibility and rigidity.
PVC Survival Bow Design
PVC bow designs fall into three different categories:
- Longbow. The longbow is the simplest of all designs. It consists of a straight piece of pipe, which has been drilled at both ends for it to be strung. When the bow is strung, the pipe is bent to form an ark.
- Recurve bow. The recurve bow is probably the best combination for PVC. The curved arms and reverse curved tips greatly increase the potential energy stored in the bow, while making it more compact and easier to use.
- Compound bow. Modern hunting bows are compound bows with a pulley attached to each end of the arms. This design allows much more force to be stored in the bow, while making drawing and holding the bow easier.
Theoretically, PVC bows can be made out of any size PVC pipe. but reality poses some limitations on us. While I have seen a few longbows made out of one inch diameter pipe, most are made of 3/4 inch, schedule 40 pipe. This pipe provides a nice balance between rigidity and flexibility. Don’t use thin-wall PVC, as it isn’t strong enough to provide any true energy when released. It is also much more likely to kink when the bow is drawn.
Making the PVC Recurve Bow
The basic difference between the recurve bow and a simple bow made out of straight PVC pipe is that the recurve bow is curved to increase the amount of velocity it can transfer to the arrow. This curve is made by heating the PVC with a heat gun, bending it to the desired shape and holding it there while it cools. No special tools or jigs are needed, with the exception of the heat gun and one large can.
New Mini Pocket Power Plus Can Charge All Your Electronics — And Jump Start Your Car!
I used a four-foot piece of 3/4 inch, schedule 40 PVC pipe for my bow. You can use a longer piece if you like (up to six feet long), but I wanted a compact bow. Mark the center four inches of the bow, as that will be your handle. Also mark eight inches from each end, as those will be the curved tips.
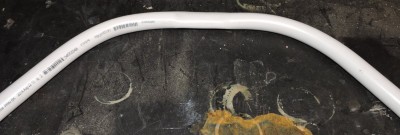
The first bend is to make the main curve of the bow arms. You will be heating and bending one arm at a time. Heat the section from the edge of the handle to the mark for the curved tip, stopping a little short of the curved tip. Rotate the PVC as you are heating it, so that it heats evenly all the way around.
Please note that if you are heating the PVC with a back and forth movement of the heat gun, you will end up heating the ends of the stroke more than the middle. Make a portion of your strokes shorter (about 1/4 of them), covering just the center of the area, to ensure even heating.
Once the PVC has softened, bend it to form a curve. This curve should make the end of the arm point about 45 degrees from the original direction. Perform the bending on a flat surface, such as a workbench top, to ensure that you keep the entire bow on the same plane and to avoid a corkscrew shape. Hold until it cools, and then repeat for the other side.
It can help to mark the actual curve you end up with from the first bend on a piece of cardboard, so that you can use that location as a template for the other side. That way, you can ensure that both arms are bent evenly.
With the primary bend in the two arms, it is time to reduce the amount of depth of the bow by recurving it at the handle. This will be a short bend, only heating the four inches of pipe that is directly adjacent to the handle. Push the curve back in the other direction, making a bump in the overall geometry of the bow.
Please note that we haven’t changed the original curve of the arms by doing this; we have just changed the beginning of the curve. Since the rest of the curve hasn’t been heated, it shouldn’t change.
The next step is to recurve the ends. In the process, they will become somewhat flattened. Many people do this by flattening them first and then curving them. I find it easier to just curve them, allowing the flattening actions to come about as a natural part of curving the piece. This also makes the transition from round to flat gradual, eliminating stress points.
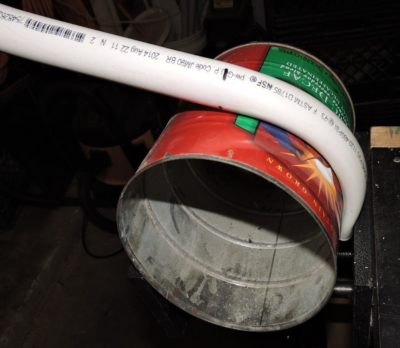
To recurve the ends, you’ll need a coffee can or other large can and a vice. I used a woodworking vice in the picture, but you can use any large vice you have available. If you don’t have a vice available, you can hold it by hand as long as you are wearing insulated gloves.
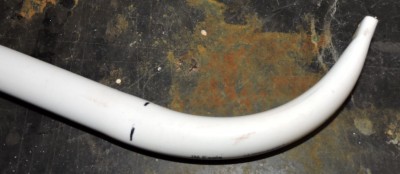
Heat the end eight inches of the arm. Clamp the last 3/4 inch of it in the vice, with the coffee can and bend the pipe around the can. You want about a 90 degree angle between the tip of the arm and the end of that recurve. Since the idea here is to recurve the bow, the direction of the curve should be the opposite of the main curve of the arm. The flat at the end should be crosswise to the plane of the bow, so that when you are holding it, you see the flat and not the edge of the flat.
You need to be very careful at this point, as it is easy to make this bend in such a way that the tip goes off to one side, rather than being on line with the bow. If that mistake happens, the problem can be rectified by reheating the pipe just at the beginning of the tip recurve and adjusting it to align with the rest of the bow.
Allow the pipe to cool and then remove it from the vice. Repeat for the other end. If the very end of the pipe is not totally flattened or if it still has an opening after recurving the tips, you may want to reheat just the very tips and flatten them again.
The ends of the bow arms need to be notched to hold the cord. This can be done by drilling 1/4 inch holes through the flat of the ends. Then, cut the material out between the hole you just drilled and the edge of the flat on the pipe.
You can paint the finished PVC pipe bow as desired to make it harder to see when you are stalking game through the woods.
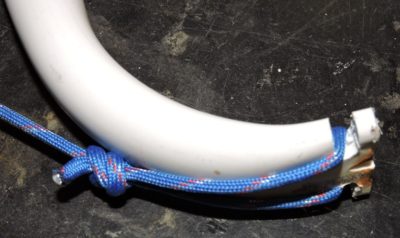
The last step is to put a string on your bow. If I was planning on using this bow regularly, I would have a real bowstring made for it. But since this is a survival bow, I’m going to use something that I would normally have on hand in a survival situation — paracord. Tying a loop on each end of the paracord allows it to be attached to the ends of the arms, where it can be held in place by the loops. The cord should be a little shorter than the natural span of the bow, so that you have to bend it slightly to string it.
You will notice in this picture that the PVC at the tip of the arm is somewhat brown. This is what happens if you overheat the PVC while working it. That happened while I was reheating the PVC to flatten the ends.
By following these steps, you will have created an inexpensive and durable bow. Now you know that you can build an effective survival weapon with materials you already have on hand in your home.
Have you ever made a PVC bow? What tips would you add? Share them in the section below:
Bow Hunting Vs. Rifle Hunting: Which Is Best? Read More Here.
 Off The Grid News Better Ideas For Off The Grid Living

