 Print

Before The Snow Flies… Find Out What’s Hiding In Your Flour
A Simple Pantry Inspection Could Save You Food, Money, And Trouble
You hauled it home, paid for it, and stacked it neatly on the shelf. Then one evening, a little brown moth flutters past the kitchen light—and suddenly that bargain sack of rice doesn’t look like such a bargain.
Meanwhile, behind a folded bag or inside a cereal box, tiny caterpillars may be stringing silk through tomorrow’s breakfast. They don’t need much room, and they certainly don’t need your permission.
For a homesteading family, a stocked pantry means fewer trips down icy roads and more breathing room when the weather turns ugly. When snow drifts across the lane and the store is forty minutes away, losing flour, oats, and rice isn’t just aggravating. It can sabotage the winter backup plan you’ve worked so hard to build.
Fortunately, you can stop these pantry bandits before they spoil another meal. The job takes a close inspection, a thorough cleanup, and better storage habits—but it doesn’t require turning your kitchen into a pesticide project.
That Little Moth Is Your Warning Bell

First, here’s what to look for. The Indianmeal moth is a common pantry troublemaker, with pale gray or tan coloring near the base of its front wings and coppery brown toward the tips. Think of a tiny moth wearing a two-tone work jacket.
But the fluttering adult isn’t chewing through your supper. Its larvae—the little caterpillars tucked into the food—do the feeding, leaving webbing and droppings behind. Cornell’s pantry moth guide explains that mature larvae may crawl away from food to find a place to pupate, including cracks and the joint where a wall meets the ceiling.
That’s why a caterpillar over the kitchen doorway can point to a problem on a shelf across the room. Follow the evidence back to the groceries instead of assuming the insect started where you found it.
And remember, a moth in the kitchen deserves investigation, not an automatic guilty verdict. If you can’t connect the insects to stored food, ask your local Extension office to help identify them before you empty half the house.
Hidden Hitchhikers Can Come Home With the Groceries
Often, pantry pests arrive in an infested food package. You can keep a tidy kitchen and still bring home an unexpected hitchhiker in rice, flour, nuts, or animal feed. A clean house doesn’t make every grocery bag insect-proof.
Here’s the catch: an unopened package doesn’t guarantee clean contents. Some pests can get through flimsy wrapping or enter at folds and seams, and an infestation may have started before the food reached your shelf. That innocent-looking cardboard box isn’t a bank vault.
Other insects cause similar trouble, including flour beetles, sawtoothed grain beetles, and grain weevils. The exact insect matters for identification, but the first chores are familiar: find the source, remove it, and protect the rest of the food.
So don’t stop after swatting the moth you can see. A swatter settles one small argument. It doesn’t inspect the oatmeal.
Pull Everything Out and Hunt Down the Source
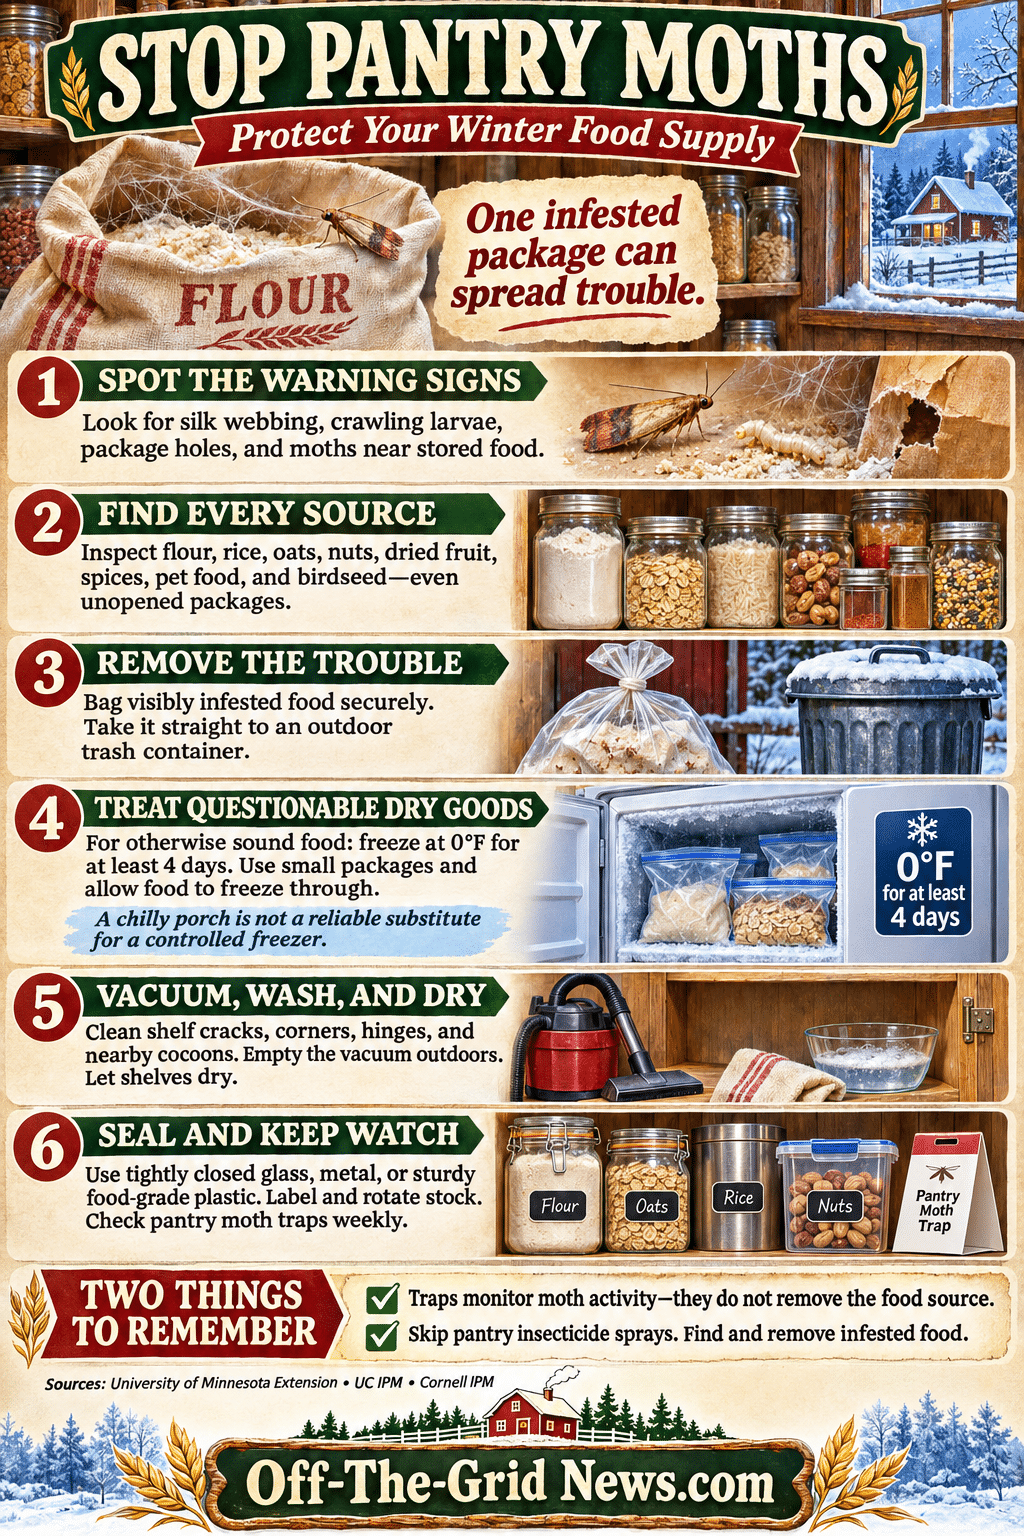
Now, grab a good light and start with an empty shelf. Remove dry goods from the pantry, nearby cabinets, and any overflow storage you use for bulk purchases. Set aside enough time to inspect the food instead of shuffling it from one shelf to another.
Next, look through rice, flour, cereal, pasta, oats, nuts, dried fruit, spices, and chocolate. Check dry pet food, birdseed, stored garden seed, and dried decorations, too. An overlooked sack of feed can keep the whole problem going while you scrub the kitchen twice.
Up close, look for silk threads binding food together, crawling larvae, small beetles, holes in packaging, and fine debris that doesn’t belong there. Examine bag folds, box corners, container rims, and the space beneath packages. When needed, pour a small amount onto a clean tray so you can see what you’re dealing with.
Also check nearby walls, shelf supports, and ceiling corners for cocoons. Write down where you find activity; that simple note can help you spot a missed source later. UC IPM’s pantry pest guidance recommends inspecting packages and looking for webbing and small holes.
Get the Infested Food Out Before Trouble Spreads
Once you pinpoint an infested item, bag it securely and take it straight to an outdoor trash container. Don’t park it in the kitchen wastebasket while you finish the job. And don’t set an open sack in the garage beside your replacement supplies.
Throw away visibly contaminated food. Freezing or heating may kill insects, but it doesn’t remove the webbing, droppings, or other mess already mixed into the product. Nobody put up winter stores because they wanted extra chores picking through ruined cereal.
The best part? You don’t have to throw away every sound jar merely because it shared a shelf with a bad bag. Inspect carefully, isolate questionable goods, and make decisions package by package. The goal is a clean pantry, with as little unnecessary waste as possible.
Stop Hidden Hitchhikers With Real Freezer Cold
For dry food that looks clean but may contain hidden insects or eggs, University of Minnesota Extension recommends freezing at 0°F for at least four days. Split bulky purchases into smaller packages so the food can cool through; don’t assume the middle of a big sack freezes as quickly as the outside.
A week gives you a convenient household routine, but the temperature is crucial. Use a freezer thermometer, avoid crowding a freezer with more than it can handle, and allow time for the food itself to get thoroughly cold.
Now, about that northern porch: cold enough to numb your fingers isn’t necessarily 0°F. Sunshine and daytime warmups can change conditions quickly, so a porch or shed shouldn’t replace a controlled freezer treatment unless you can verify the required conditions throughout.
Afterward, let the food return to room temperature while still sealed before opening it for repacking. You want to keep room moisture from condensing on cold food. Dry goods need to stay dry through the entire process.
Heat Can Work if Your Oven’s Up to the Job
Minnesota Extension also describes treating questionable dry goods in shallow pans at 130°F for at least 30 minutes. That is a specific low-temperature method, not an invitation to guess at a hotter setting or warm a whole bucket at once.
Before you start, check whether your oven can reliably hold that temperature, using an oven thermometer. Many household ovens won’t maintain such a low setting well, and heating can affect food quality. If you can’t control the temperature, choose the freezer method instead.
Then cool the food completely before packing it. Neither treatment turns moldy, rancid, or visibly infested food back into good groceries. Use these methods for hidden hitchhikers in otherwise sound food, not as a rescue mission for everything on the discard pile.
Clean the Cracks Where the Crumbs Hide
With the food removed, vacuum shelves, corners, seams, hinges, and shelf-pin holes. Work along the underside of shelves and around nearby trim. Every overlooked crumb is a free meal for a pest you want gone.
Then empty the vacuum outdoors, securing the debris in the trash; discard its bag if it uses one. Wipe shelves with soap and water and let them dry thoroughly before restocking. Clean storage bins and container lids as well.
Still, don’t mistake a strong cleaner for an insect barrier. Bleach, ammonia, and scented shelf treatments won’t fix a missed food source. Here’s what counts: remove food debris and insects, then keep clean supplies protected.
Also leave insecticide sprays out of this cleanup. They don’t reach insects hidden inside food packages, and spraying around groceries introduces another problem. Finding that forgotten bag behind the crockpot will do more good than perfuming the cupboard with bug spray.
Give Your Groceries Better Walls
Next, rebuild the pantry with tightly closed glass, metal, or sturdy food-grade plastic containers. Check the lids and seals as carefully as the containers themselves. A fine jar with a poor-fitting lid gives you false confidence.
Wash reused containers and dry them before filling. Keep new purchases separate from older food rather than pouring fresh flour onto the last two cups in the bin. That way, you can inspect, clean, and rotate each batch without carrying an old problem forward.
For everyday use, pack manageable amounts and label each container with the food and purchase date. Keep the original product and lot information when practical, too. Clear labels beat trying to remember which white powder went into which jar last February.
Meanwhile, store pet food and birdseed separately from the main pantry in secure containers. A garage or outbuilding works only if it stays suitable for the product and keeps moisture and rodents out. Moving a flimsy feed sack twenty feet doesn’t turn it into protected storage.
Set Your Lookout and Don’t Let Your Guard Down
Pheromone traps labeled for pantry moths can help you detect activity after cleanup. They attract males of the target moth species; they won’t catch every pantry pest, and they won’t clean out an infested package. Follow the label for placement and replacement.
Check them weekly and keep a simple record. A quiet trap is useful information, but it’sn’t permission to quit inspecting. Likewise, a few moths after cleanup don’t necessarily mean the whole effort failed, because insects already developing away from the food can still emerge.
If activity continues, hunt down what you missed—especially in feed, seldom-used ingredients, and overlooked storage areas. Keep vulnerable foods sealed while you investigate. The trap is your lookout; you still have to find the trouble.
Protect Your Stockpile With Storage That Fits the Food
For long-term reserves, match the packaging to the product. Utah State’s white rice storage guidance lists tightly sealed food-safe containers, cans, and Mylar-type bags among suitable choices. A sealed food bag inside a sturdy food-grade bucket also gives you a practical way to organize and protect a reserve.
Still, here’s a crucial detail: a bucket lid isn’t a promise that everything inside will keep for years. Food type, temperature, moisture, packaging, and the condition of the original purchase all matter. Treat long-term packing as a separate job from filling the kitchen flour jar.
Also be careful with oxygen absorbers. Utah State Extension warns that foods stored with them must be sufficiently dry—about 10 percent moisture or less—because moist food in reduced-oxygen packaging can present a botulism risk. Follow reliable, food-specific storage guidance rather than dropping an absorber into every jar you own.
And don’t give nuts, brown rice, and white rice the same storage timetable. Brown rice contains oils that shorten its shelf life; USA Rice recommends refrigerator or freezer storage for longer keeping. A moth-proof container can’t stop every kind of food deterioration.
Trade Pantry Panic for a Routine You Can Rely On
From here on, inspect purchases before they join the reserve. Rotate older stock forward, clean spills promptly, and keep seldom-used ingredients where you can see them. When practical, buy everyday pantry items in amounts you’ll use within a few months, while managing emergency reserves with deliberate packaging and rotation.
Before you shell out for more supplies, check the lids, containers, and storage space you already have. Spend on what closes a real gap: reliable seals, suitable food-grade packaging, clear labels, or a thermometer. Another bargain sack won’t help if the last one is already a feast for moths behind the shelf.
Your pantry deserves the same attention as the woodpile and the well pump. Scour it for trouble and protect what you’ve worked to sock away. Then, when sleet rattles the windows and supper needs making, you can open a sound container instead of discovering somebody else has already moved in.
Let winter come. The oatmeal is spoken for.