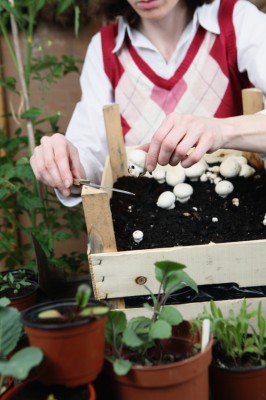
A cooking staple, button mushrooms are actually a lot easier to grow than even the most seasoned of gardeners are aware. Some may feel hesitant about growing their own mushrooms, but the reality is that when you purchase spores from a reputable company, you won’t need to have any concerns about the mushrooms that you grow.
There are numerous growing kits available from so-called mushroom boutique stores, and they can allow you the opportunity to grow portabella, oyster, shitake, and button mushrooms, along with several other kinds. This is a great way to experiment with various types of mushrooms, but it can also be somewhat on the costly side. The best method is to contact a commercial seller of mushroom spawn so that they can provide you with what you need to get your button mushrooms growing and thriving. You may need to purchase commercial quantities of mushroom spawn, but the long-term cost-savings is absolutely worth it once you get your mini mushroom farm off the ground.
Getting Started
There are several tools and pieces of equipment that you will need in order to grow your mushrooms, and these same tools will actually be very useful to you should you decide to branch out into other types of mushrooms later on down the line. You will need the following:
- Well-aerated space (like a large shed)
- Fans to circulate the air
- Newspaper
- Water mister
- Mushroom spawn
- Organic compost
- Peat moss
- Growing trays (plastic or wooden)
- Temperature gauge
The type of growing trays that you use should be easily maneuverable, so it is typically best to construct or select trays that are three feet by two feet. This way you can easily move them around when they are in use and then stack them up in a compact space between uses. Wood is a budget-friendly material to use to construct the boxes, but you may find that a plastic box can be better sterilized between uses, in order to reduce the growth of unwanted bacteria.
The organic compost that you use will depend greatly on your preferences, but you will find that the professionals love a mixture of horse or cow manure in order to produce the best quality mushrooms. However, any good quality compost will do the job nicely. The compost should be a chocolate-brown color and have little to no ammonia scent to it; while ammonia is a naturally occurring by-product of the compost process, it can actually create a very toxic environment for your mushroom spawn.
The Cookbook that Challenges Politically Correct Nutrition and the Diet Dictocrats
Fill your growing trays with at least six to eight inches of compost and mist well with your water mister. The key to properly prepping your compost is to ensure that there is even moisture in it, but that it is not soggy and waterlogged. Pick up a handful of the compost and squeeze it: it should maintain its shape easily but should crumble rapidly when you touch it.
Once your compost is ready, mix one or two cups of the spawn flakes into the compost. Mix it well in order to evenly distribute the spawn throughout the growing tray. Ensure that the temperature in your growing space is maintained at sixty-five to seventy degrees in order to get the best results from your mushroom growth. Good air circulation is necessary as well, so use a fan if necessary. Mist the compost twice daily with tepid water. The water temperature is key because extremes either way could adversely affect the growth of your mushrooms. Misting is also important, versus spraying with a hose, as the force of poured water could be disruptive to the growing process.
Within as little as two weeks you will start to see a type of white-colored webbing forming on the surface of the soil as the fungus starts to grow. Remember that the mushrooms we eat are actually the fruit of the fungus that is growing, just like tomatoes are the fruits of the plants they grow on.
Apply a two-inch layer of organic peat moss on top of the fungus, ensuring that the peat moss is damp first. The moisture in the peat moss will promote the mushroom growth, so be sure that it is in fact moist (without being soggy). Place several layers of newspaper on top of the peat moss, and spray the newspaper down with your water mister. Keep the newspaper misted twice a day in order to maintain even moisture for your mushrooms to grow. Do your utmost to maintain the temperature at no lower than fifty-five degrees Fahrenheit and no higher than sixty-five degrees Fahrenheit; otherwise you will find that it takes a lot longer for your mushrooms to start. After ten days, you should remove the newspaper from atop the peat moss. If you don’t already have mushrooms peeking up from the compost yet, then you will see them within a few short days. This is called pinning.
Pinning is called that because when the mushrooms first start to grow through the peat moss, they look like very tiny white pinheads.
Continue to mist the growing boxes twice a day. Once the mushrooms have started the pinning process, they will start to grow somewhat rapidly. You can pick the mushrooms at any point, so it is entirely up to you and your personal preference for mushroom size.
Keep in mind that picking the mushrooms when they are young will give you a nice firm mushroom that is ideal for enjoying fresh in salads, on sandwiches, or simply as a snack. If you allow the mushrooms to grow to full maturity, the gills underneath the mushroom cap will open up and you’ll find that the button mushrooms have a flavor that is much more robust and bold. The majority of button mushrooms sold in grocery stores are picked young enough that the gills have not yet opened, so consider allowing a few of yours to reach maturity so that you can experience the intense and robust flavor that homegrown button mushrooms can offer you.
From your original growing trays you should be able to harvest a new batch of mushrooms every seven to ten days for up to six months. Grow several trays at different stages so that you have a continual harvest of fresh mushrooms to enjoy all year long.
Mushrooms can be frozen, dried, or enjoyed fresh. Because they are such a popular kitchen staple, you may also find that they are a huge hit when given as gifts or used to trade with friends and neighbors for some of their excess bounty.
Once you are comfortable with growing the popular and easy-to-grow button mushrooms, you can move on to experimenting with growing porcini mushrooms, which are baby portabellas, as well as the mature variety of portabellas. Oyster mushrooms are also a great choice, because some of them actually have a mild seafood flavor, which can impart rich flavors to your favorite dishes.
 Off The Grid News Better Ideas For Off The Grid Living


