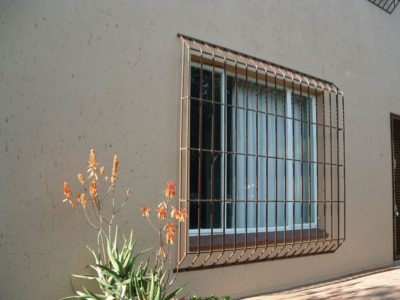
Image source: Ablegates.co.za
Conventional home security is mostly predicated on the saying, “Locks only keep honest people honest.” I mean, look at your average home today. Even a dead-bolted door can easily be opened with enough force. The sliding glass door is even worse, and whoever thought that windows were secure, anyway? Something that can be broken as easily as glass will truly only keep the honest people out, even if they are locked securely.
It is possible, though, to secure the windows of your home well enough that a break-in artist isn’t going to be able to get in. Burglar bars are pretty much fool-proof, unless the criminals are willing to attach a truck to them with a chain. Short of that, they’ll keep your home secure.
Burglar bars essentially look like jail bars over your windows, but they are secure. In Mexico they are actually rather common, especially on the more affluent homes. This idea has moved into the Southwest United States, where you can see a lot of homes with burglar bars on them. If you want your home secure, this is definitely the way to go.
The big problem with burglar bars is the expense of installing them. There are commercially available bars, which are size adjustable, available through the big home-improvement centers. But these are not anywhere near as strong as the custom-made ones, which is what people typically use.
You can save yourself a lot of money by building your own burglar bars. It really doesn’t require a lot of equipment, and you can buy inexpensive versions of the equipment that you do need. Those will work quite well and are not very expensive.
What You’ll Need to Make Your Burglar Bars
There are three basic pieces of equipment you need to make your burglar bars: a welding machine, a cutoff saw and clamps. In addition, you’ll want to have tinted goggles or a tinted face mask and welding gloves. The gloves are insulated leather gloves to protect your hands.
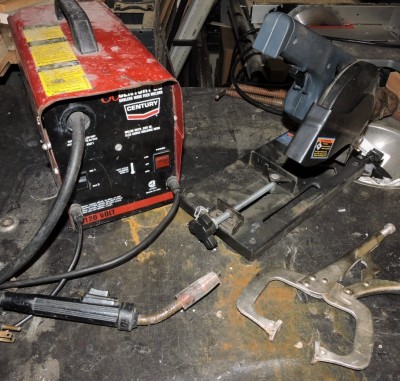 As you can see from this picture, my welder is a bit old and beat up, but it still works fine. This is the least expensive model of wire-feed arc welder you can find on the market. You can buy a unit similar to this for less than $150. It doesn’t have as much flexibility in settings that a larger one would, but for what you need to have in order to make burglar bars, it’s just fine. It uses a flux-cored wire, so there is no need for shielding gas. I’ve actually built a couple of trailers with this one, although that was really pushing its capability.
Since the materials you need to use for making the burglar bars are small in size, you don’t need a large cutoff saw. The one in the picture uses a six-inch diameter abrasive cutting blade. If you have a miter saw, you can save yourself the cost of a cutoff saw by replacing the blade with an abrasive metal cutting blade.
The locking pliers shown in the picture are special ones used for welding. These are very useful for holding parts together. I have a number of these, although for the purpose of making burglar bars, you only need a couple of them.
Decide on the Mounting
Before going any farther in the design and manufacture of your burglar bars, you need to decide how you are going to mount them to your home. There are several choices you need to consider.
My Personal Defender: Low Cost Way To Defend Yourself Against Lowlife Criminal Scum!
To start with, you need to decide if you are going to mount the bars on the inside or outside of the home. I have seen them mounted both ways, although exterior bars are definitely more common. I’ve even lived in one house that had them on both the outside and inside of the windows. I think the landlord had been a little paranoid. The advantage of the interior bars is that they are not visible from the street and they are harder to pull off with that truck and chain. However, they are visible on the inside of your home, unless you cover them with curtains.
If you decide to mount them on the outside of your home, your next decision is if you are going to surface mount them or inset mount them. Inset mounting can only be done with brick homes, and it means to mount the bars so that the mounts and screws are on the edge of the brick, where the brick makes a frame around the window.
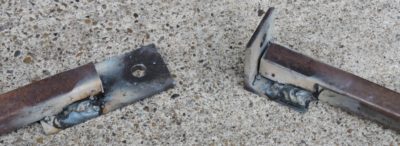 These are the two types of ends you would make for the mounting. The bracket on the left if for surface mounting. This is what you would do if you have wood siding or if you decide to mount it to the face side of the brick. The end consists of a 2-inch piece of 1/8 inch x 1-inch steel strap. A hole is drilled through the end for the mounting bolt and it is welded to the backside of the crossbar.
The bracket on the right is for mounting either indoors or inset mounting on the outside of a brick home. This is a one-inch piece of 1-1/4″ steel angle, with a mounting hole drilled in it. The advantage of inset mounting is that it is harder to pull out than face mounting. Whenever you are drilling into a brick or cement substrate, you have to use some sort of insert for the screw or bolt to go into. Those can be pulled out, easier than pulling the bolt itself out. By using an inset mount, they either have to break the bolts used to mount the bar or break the brick that the bolt is going into.
In Mexico, they make the burglar bars with an end that is intended to be inset into the stucco wall. This is extremely strong, but is not practical for use on a brick or wood home, or even a stucco home that is already built.
Materials for Your Burglar Bars
Other than the strap and angle mentioned for the end brackets, home burglar bars are made out of ½ inch square tubing. Typically, 18-gauge tubing is used, which would be 0.049 of an inch thick. If you want stronger bars, you can use 16-gauge tubing, which will be 0.065 of an inch thick (32 percent thicker). The steel comes in 20-foot lengths. If you don’t have a vehicle that will allow you to carry those conveniently, they will cut them in half for you, usually for free.
Ultimate Tactical Self-Defense And Hunting Weapon That Doesn’t Require A Firearms License!
If possible, don’t buy your steel tubing at the local hardware store or building supply center; find a steel supply. They may not be excited about dealing with you, as the same companies normally sell to contractors that build steel buildings and they want those big sales, but they will be able to provide you with what you need.
If you want to do anything fancy on your burglar bars, such as decorative patters, you can buy those pieces pre-made from the same steel supply that you buy the steel tubing from.
Laying Out Your Burglar Bars
Typically, burglar bars consist of two horizontal bars, with a number of vertical bars welded to them. If you have a window that is five feet or more tall, you’ll probably want to make that three horizontal bars, so that they can’t spread the bars apart to get through. Both the horizontal and vertical bars are made of the same ½ inch square steel tubing.
There are actually an infinite varieties of designs you can use for making your burglar bars but for the sake of this tutorial, we’re going to stick to something fairly simple. Therefore, your horizontal bars should be about six inches from the top and bottom edges of the windows and your vertical bars should be spaced about every six inches apart (from 4 to 6 inches, with the larger dimension being preferred). Adjust the spacing of the vertical bars as necessary, to make it possible to space them evenly across your window.
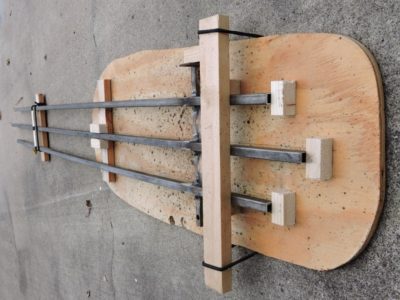 In a professional welding shop they have steel tables to work on, where they can clamp the bars together with numerous clamps, before they start welding. We don’t have that capability, so we’re going to cheat. Instead of using the steel table and lots of clamps, make a jig to hold the pieces in place while you are welding them.
The jig above is made out of scrap plywood and 1 inch x 2 inch material from my workshop. This set of bars is rather narrow, only having three vertical bars. They are for the side-lights for my home’s front door. As you can see in the picture, the middle bar is four inches longer (2 inches on each end) for styling.
The idea behind this jig is to hold the pieces in place, while I am welding them. I used a number of short blocks, glued in place, to align the various bars that I am working with. The piece of 1 inch x 2 inch wood going across the top of the metal bars is to clamp them in place. It is held in place by a piece of bungee cord material, which I tied in a loop. The loop goes under the plywood mounting board for my jig.
This may look a little sloppy, but I assure you, it held my bars in place fine while I welded them. Once I had welded one end, I flipped the bars around and put the other end in the jig to weld it as well. The jig does get burned a bit in the process of welding, but that’s okay, as it is disposable once I finish the project.
Welding the Bars
The vertical bars need to be welded to the crossbars on both sides, every place they cross. That means that each crossing will ultimately have four welds, two on the face side and two on the back side.
It is very easy to weld this square steel tubing, as it is thin. Check the information for your machine, so as to know how to set it for the material thickness. On my welder, I used the lowest setting. If you use too high a setting, you will probably end up burning a hole through the steel tubing. That will mean having to fill the hole with welding wire, so your bars will look okay.
New Survival Energy Product Makes Every Window A Powerful Solar Charger
If you’ve never worked with a wire-feed welder, they are extremely easy to work with. Hey, I can do it, and my hands are a bit shaky. I have trouble every time I try to use a stick welder. But I can weld with a wire feed welder very easily.
The welding wire will come out of a hole in the nozzle end of the welding pistol. That means you’re only working with a piece of welding wire that’s about ½ inch to ¾ of an inch long. With such a short wire, it’s very easy to control where it goes. That makes it a lot easier to work with. The welder will keep feeding welding wire through the gun as you use it.
Weld with a traveling circular pattern, making circles about ¼ inch to 3/8 inch in size. In other words, make the circles but have the gun move from one end of the area you want welded to the other, while you are making them. Your circles should go halfway over each of the two pieces of metal that you are welding together. That will give you a nice clean weld pattern.
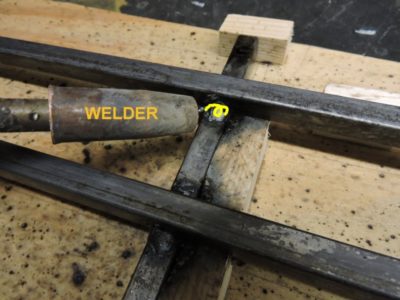 When welding the ends onto the crossbars, you will need to modify your welding pattern slightly. Both the steel strap and the steel angle are 1/8″ thick, which makes them about 2 1/2 times thicker than the wall of the square tubing. So, it will take more heat to melt the brackets than it will to melt the tubing. The way you handle that is to vary your speed, so that about two-thirds of the time you are on the bracket and one-third of the time you are on the tube.
Finishing the Burglar Bars
Once you are done welding your burglar bars and have checked all of the connections to ensure that they are properly welded, it’s time to apply some finish to the bars. Clean off the welds with a wire brush to remove all the weld flux. If there is any weld splatter (little balls of the welding wire), knock it off as well. It will come off easily with a straight-bladed screwdriver or a set of wire cutters.
The steel tubing you bought is probably somewhat oily and greasy. This is typical, because oil is used in forming the tubing, as it is drawn through the dies. You will need to clean that off with a good degreaser before going any farther. Dishwashing liquid, mixed with water, works well. Don’t worry about getting it rusty, as that’s the next thing we’re going to take care of.
The bars will probably also have a small amount of rust on them, especially if the tubing sat around your garage for a while, waiting for you to get the project done. This can be solved easily by phosphate treating your bars. You can buy phosphate treatment in most paint and hardware stores. It is a green liquid in a quart bottle and will have one of several different names on it, all sounding something like “Phospho.” Spray or brush this liquid onto all metal surfaces and allow it to dry. It should turn your rusted areas black.
You may choose to put spear ends or finials on the ends of your vertical bars. This adds a nice decorative touch. These are usually cast iron, but the ones in the picture are plastic. I chose to use plastic ones for my windows, because my small welder isn’t powerful enough to weld the cast iron ones onto the tubing. Since they are plastic, I glued them on with epoxy.
You can now paint the bars with any metal paint that you want. If you use spray paint, paint it several coats, as the spray paint does not provide a very thick coat. If the bars are to be installed outside the home, you’ll want a fairly thick coating of paint on them. Once the paint dries, you’re ready to install.
Have you ever installed burglar bars? What advice would you add? Share your thoughts in the section below:
Do You Know The 4 Distinct Areas Of A Solid Home Defense Plan? Read More Here
 Off The Grid News Better Ideas For Off The Grid Living


