Vinegar is a potent antiseptic and is critical to food preservation. It’s also easy to make if you know what you’re doing.
There are two fundamental food resources that have both antiseptic and food preservation qualities: Vinegar and salt.
In a self-reliant environment, you can’t assume you will find many things you typically take for granted. Something as simple as salt is a good example. Salt had historically been used as a preservative and flavoring for food. Roman soldiers were compensated with a ration of salt for their efforts and salt defined their wealth. But what do we do when we don’t live by an ocean or a salt resource like a salt-spring or the Great Salt Lake? The fact of the matter is we can’t make salt, but we can make vinegar.
Vinegar has many positive properties similar to salt in terms of food flavoring and food preservation, in addition to surprisingly potent antiseptic properties. This is because vinegar is in fact, acetic acid. Many professional cleaning companies use a vinegar and water blend to clean and sanitize surfaces and equipment. But it’s also good to eat, which is a bit unique when you think about something that’s also antiseptic. If you’re off-the-grid and improvising solutions, vinegar is literally a solution that can allow you to accomplish significant things from fighting bacteria to safely preserving food to simply adding flavor to the foods you like or even tenderizing some tough cuts of game in a marinade.
If you are planning to transition to a self-reliant, off-the-grid lifestyle, or are concerned that you and your family may need to pursue that lifestyle for any number of reasons, then mastering the art of homemade vinegar making is a valuable skill.
The fundamentals
 The key is to know what natural resources can allow you to make vinegar and the process for fermenting it in the first place. The fundamental need is a fruit or vegetable that is high in fructose sugars that when reduced to a juice will ferment to create vinegar. Apples are the prime candidates, but grapes, berries and some root vegetables like carrots and beets can produce a vinegar as well.
The process is actually quite simple. In fact we’ve often made vinegar by mistake. If you’ve ever corked a bottle of wine and let it sit in a cabinet for an extended period of time, there’s a good chance your wine turned into vinegar.
Let’s keep it simple
For the sake of simplicity, we’re going to focus on apples as the base for this vinegar-making exercise. Apples are somewhat ubiquitous, and with a bit of mashing and pressing, produce a good amount of juice for fermentation.
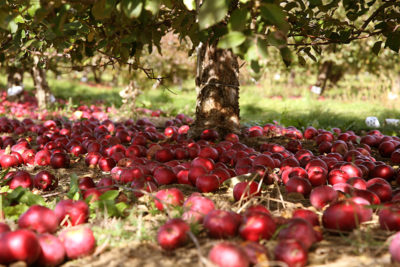
If you are picking your own apples, you want to wait until early to late autumn. Windfall, or apples on the ground are the best. These are the ripest and have the most sugars. That’s why they fell from the tree. Green apples don’t have enough sugars to kick in the fermentation you need to make vinegar. Ripe and overly ripe apples make the best vinegar. Wash them, chop them and crush them and collect the juice. There are simple, manual machines you can buy to do this, or you can find some tools like a fruit press at antique stores that still function and will probably be a bit cheaper if you’re fortunate.
If you’re using fruit like wild grapes or berries, you could probably press them by hand or with a potato masher and boil them in about a gallon of water. You’ll want to strain any pulp, whether it’s apples, berries or grapes, and try to get a clear juice. The goal is to get a lot of juice and head to the next step. Adding some water helps to increase the volume of juice in case you don’t have an abundance of grapes or berries.
One note on yeast for vinegar making
Some recipes call for the addition of yeast to the liquid to begin the fermentation process. Yeasts commonly associated with wine-making are typically recommended, but standard bread yeasts can work in a pinch. In actual fact, you don’t have to add the yeast. Yeast spores are in the air everywhere and will find their way to the liquid, but if you take this natural yeast approach it will take a bit longer to make your vinegar. It’s all a matter of luck with the wild yeast-in-the-air approach, but it often works.
There is also a technique that uses an air-lock on a glass jug. This approach creates an alcohol as a first step which is then converted to vinegar. It’s a bit more complicated so we’re going to take the easy, natural approach using as few steps and ingredients as possible — and simple tools. If you want to try the airlock approach you can buy one at a wine-making retailer or on the Internet. This approach will convert your juice into an alcohol that is then converted to vinegar with the direct method we’re going to explore. The fact of the matter is that you can skip the alcohol step and actually create a good vinegar directly from the raw juice.
Homemade vinegar the easy way
The tools:
- A 2-gallon crock (or a 2-gallon glass jug).
- A piece of clean fabric large enough to cover the top of the crock or jug.
- Cheesecloth, fabric or coffee filters.
- Rubber bands or twine to hold the fabric in place over the top of the crock or jug (a thin, circular strip of a large rubber inner tube works great around the rim of a 2-gallon crock).
Ingredients for homemade vinegar:
For this recipe you’ll need one and a half gallons of apple cider or the juice from berries or wild grapes that have been crushed and boiled in one gallon of water and strained. You could also simply make a 10 percent solution of sugar and water.
Everything You Need To Know To Become A Self-Sufficient Homeowner
If you’re using the juice of wild grapes, you might want to add a cup of sugar or a couple of ounces of molasses. Wild grapes are much more sour than domestic grapes. It’s the sugar in the fruit or the sugar that you add that will determine the overall acidity of your vinegar and how long it will take to ferment. Most store-bought vinegars have an acetic acid level of 4 to 5 percent. It’s quite possible that your vinegar will come out stronger. If you want to reduce the acidity, add water and taste as you go until you have the strength you like. Be careful. If you’re using vinegar for pickling and canning you want at least a 4 percent acetic acid solution. Of course, if you’re using your vinegar as an antiseptic cleaner, a strong solution will work just fine. There are tools you can order from wine-making supply resources that measure acidity, including litmus paper. There are also home-brewed formulas and processes you can find on the Internet. If you’re planning on doing any canning with homemade vinegar, you really should understand how to measure and achieve that 4 percent acetic acid solution.
Vinegar-making directions:
 Pour 1.5 gallons of juice into the 2-gallon crock. Let it sit for 4 to 6 months, tasting occasionally. Stir it daily if you can, but that’s a bit of a chore over months. If you are going to taste the vinegar while it’s fermenting you will want to filter a half cup through the fabric and boil it briefly. As the acidity grows, it will begin to kill bacteria, but it may not be strong enough in the early stages so a little boiling before tasting is a good idea.
When it has the tartness you would expect, it’s done. It’s best to let the fermentation take place in a basement or garage. The fermentation will create a vinegar odor that you may not want to smell in the house 24 hours a day. If you store the vinegar in a garage or outside, stretch the clean fabric across the top and bind it with some twine to keep out bugs, leaves and dust. The ideal temperature for vinegar-making is between 60 and 80 degrees Fahrenheit. Any higher or lower and the yeast will slow down or cease to work, and temperature extremes below freezing will actually kill the yeast and stop the process. Room temperature is ideal and that’s why the basement is often the best vinegar-fermenting location.
You could also add a pint of an already-made vinegar to the juice, and this will accelerate the process somewhat. If you’re really in a hurry, add a cube of winemakers yeast or a teaspoon of bread makers yeast. Whether you add the yeast or not, you will see a foamy scum forming on the top. Don’t worry about it. That’s the wild or added yeast doing its job. This is actually called Mother of Vinegar. You’ll eventually strain it, but all it’s telling you is that the fermentation is working. Many people will float a sponge or dried corncob in the Mother of Vinegar and then float that in the next batch of juice. This also helps to accelerate the process.
Some people use a two-gallon glass jug to ferment their vinegar. That’s up to you. It could take longer with a glass jug, because the surface area exposed to the air determines the speed of the fermentation. In fact, a glass jug could take up to nine months to reach peak acidity but it usually happens faster, even in a glass jug. Remember to only fill the jug to the level where the top begins to taper. This will give you more surface area. Vinegar fermentation takes place on the surface. If you do go the glass-jug route, remember to put a small swatch of fabric over the top of the jug. A couple of rubber bands will easily hold it in place. You’ll also find it’s a bit easier to stir by simply swirling the jug. When the vinegar is done, filter it through the multiple layers of cheesecloth.
Achieving a clear, translucent homemade vinegar
Even after filtering, your homemade vinegar may be a little cloudy. You want a really clear, translucent vinegar. You also want to make sure the “Mother of Vinegar” has been thoroughly filtered out, or the fermentation will continue. Either filter it again through layers of cheesecloth or you could always boil it briefly with egg whites whisked into the liquid and strain it again through multiple layers of cheesecloth. The egg whites act as a colloidal agent and capture the particulate matter that makes a liquid cloudy and opaque. They will also capture any remnants of the yeast. When you filter through the cheesecloth, the egg whites are easily trapped along with any particles that have adhered to the whites.
Seal your vinegar in canning jars or if you can spare it, just cap the jug. You really should process your vinegar even though it has great antiseptic properties. You can do this by boiling it gently for 10 minutes (don’t forget the egg whites), straining it into glass jars that have been sanitized in boiling water, and then processing the jars in boiling water for 10 minutes. It doesn’t require refrigeration and should keep for years as a result of the processing and its powerful anti-bacterial properties.
If you’d like to flavor your vinegar with herbs or aromatic vegetables like onions or garlic, just add them to the jars before filling and processing.
Ultimately, this is a trial and error process. If you have the time, the inclination and the equipment, you might want to try multiple batches with variations of juices, added sugars like brown sugar, molasses or honey, and added yeast or no yeast. Because it takes a while for the vinegar to ferment (4 to 6 months), making multiple batches can accelerate your learning curve so you can determine the recipe and approach that’s best for you and your needs.
Have you ever made vinegar? What advice would you add? Share your suggestions in the section below:
 Off The Grid News Better Ideas For Off The Grid Living


