Image source: AreNariaGardens.com
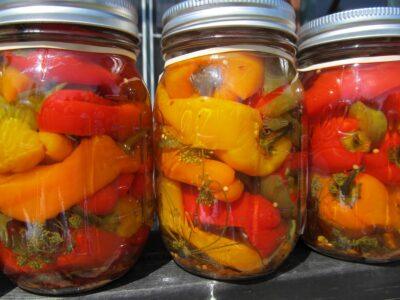
One of my favorite things to preserve from the garden are peppers. Hot peppers, sweet peppers, jalapenos, Serrano peppers, banana peppers, pimentos … if it is a pepper with a skin, it can be pickled first and then canned in a traditional water bath.
Pickled peppers are extremely easy to prepare and can, and they taste so much better than store-bought canned peppers. Now’s the perfect time to can them while your garden is producing them in large amounts. You can also purchase them at your local farmer’s market for just pennies on the dollar. Process them now, and use them up this fall and winter. Perfect for adding to your winter soups, stews, chili and more.
Prepared the pickled way, your peppers will have a shelf life of about 12 to 18 months. (Mine never last that long because we eat them up!) You can also process un-pickled peppers, but it will require use of a pressure canner. Pickled peppers do not require a pressure canner and can be safely preserved using only a water bath.
You’ll Need:
Peppers
Vinegar
Water
Canning Salt
Garlic cloves (optional)
Peppercorns (optional)
Pint jars
Basic water bath canning equipment
Step 1: Select Peppers
The first step is to select your peppers. You want to make sure to pick the ones that are fresh and crisp. Straight from the garden is perfect. Look for any blemishes or bad spots and throw those peppers out. You only want to preserve healthy peppers.
Prepare now for surging food costs and empty grocery store shelves…
Small- to medium-sized peppers tend to can better and often taste better, too. The larger peppers often become too tough and lose their flavor.
Step 2: Wash and Cut Peppers
Next, you are going to wash and then cut the peppers. USE GLOVES IF NECESSARY. Hot peppers can burn your skin. Take caution not to touch your face or eyes. Slice your peppers into rings, quarters or strips — whatever you prefer. Very small peppers can be left whole. Remove the cores and seeds. Some folks like to keep a few seeds in the mix to add heat. This is completely your preference.
While cutting, peel your garlic if you wish to include it with your pickled peppers. I put one to two cloves in each pint jar of peppers.
Step 3: Make the Brine for Pickling
In a stockpot, combine one quart of vinegar and one cup of water. As it begins to slightly boil, add a half cup of canning salt. Stir and allow the salt to dissolve, and reduce heat. This is the brine you will pour over your peppers. Keep it warm while you are slicing peppers and preparing jars. You can double or triple the brine recipe depending on the amount of peppers you will be canning.
Step 4: Pack the Jars
In clean, sterilized, and prepared pint jars, fill each one with cut peppers, leaving enough space to add the brine. Add in the garlic clove and a few peppercorns if you desire. Cover the peppers with hot brine, leaving at least one-fourth inch of headspace. Pack down and remove air bubbles. Add your prepared lids and bands.
Step 5: Process in a Water Bath
Process your pints in a boiling water bath for 10 minutes. Make sure jars are adequately sealed before storing on the shelf.
And that’s all there is to it! My family really enjoys eating these pickled peppers on nachos, in chili, in soups … even plain! And these colorful jars also make great gifts.
What are your tips for canning peppers? Tell us in the comments section below.
Sign up for Off The Grid News’ weekly email and stay informed about the issues important to you
 Off The Grid News Better Ideas For Off The Grid Living


