


If you have taken the step to start a compost pile for your garden, it is time to take one more step and consider vermicomposting, or composting with worms.

Composting With Worms
Unlike a traditional compost pile, vermicomposting is a wonderful and efficient way to dispose of kitchen waste and turn it into high quality organic compost. You may find that adding wet kitchen waste to your garden compost slows decomposition down. However, it is perfect food for hungry worms, who make quick work of your daily scraps. In fact, vermicomposting can help you reduce your kitchen waste, newspapers and cardboard trash by up to one-third.
Composting with Worms
Vermicompost, the rich end result from the worm’s work, consists of worm casts (feces) and some decayed organic matter. When worms are happiest and conditions just right, they can actually eat their own weight in organic matter daily. They feed off of the micro-organisms that are eating the organic matter and their casts contain about eight times more micro-organisms than what they are consuming. The great news for gardeners is that the casts don’t contain any pathogenic bacteria, as this is all killed in the worm’s gut.
When compared to ordinary garden soil, worm casts contain five times as much nitrogen, seven times more phosphorus, and 11 times more potassium. Casts are perfect soil conditioners because they contain a large amount of humid acids. These acids have a near perfect pH balance and actually contain the same properties as those found in seaweed.
What kind of worms are used in vermicomposting?
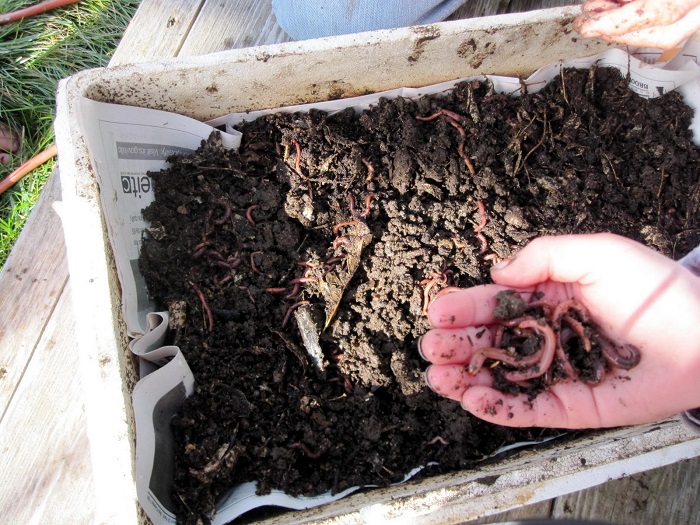
You may be familiar with the great big thick earthworms that burrow their way around your garden soil. However, the worms that are used in vermicomposting are actually not these worms but rather worms known as angle worms, manure worms, red wrigglers, river worms or brandlings. They actually live mostly near the surface of the soil where there are large concentrations of organic matter. They are commonly found in compost piles, leaf mold or pastures.
New Natural Fertilizer Doubles Garden Production!
You can find two different breeds of composting worms at most garden centers — Eisenia foetida or Lumbricus rubellas. In order to start composting with worms like these, you will need at least 1 pound or 1,000 worms which can easily increase to one million worms in a year. By starting with 1,000 worms, you will have an estimated surplus of about 35 pounds of worms in a year — this accounts for eggs that are lost when compost is harvested. You can either let the worms die off as they multiply or you can harvest them to sell, use elsewhere in the garden or start new compost boxes.
What kind of boxes are used when composting with worms?
As composting with worms becomes more and more popular, there are a number of commercial worm boxes available. Many of these, however, are made of plastic which does not breathe well. People who have have been practicing vermicomposting for a very long time suggest that gardeners build their own worm box from wood because wood is porous and allows for better ventilation. Making your own will also save you money in the long run.
Box size: Although you may find recommendations to make bigger boxes, a box that is too large is very difficult to manage. The best thing to do is to make as many boxes that handle 4 pounds of food waste a week as you need. These boxes measure 2-by-2-feet wide and 8-inches deep.
Composting with worms.
Box materials and construction: Use exterior grade 1/2-inch plywood, and be sure that it is not chemically treated. Use a non-toxic wood preservative instead or treat the box with vegetable oil. Use galvanized nails to put your box together and drill about twelve 1/2-inch holes in the bottom for ventilation. When you put your box together, be sure that the two sides are about 1/2-inch deeper so that the bottom of the box is elevated off of the ground a little. It is best to put the box in a tray because it will leak some. Also, be sure to make a lid for your box.
Box bedding
Add about 6 pounds of dry material to each worm box. Worms will eat their bedding as well as the food scraps. Any non-toxic fluffy material that holds moisture works well. Be careful not to use anything that will decompose too rapidly like alfalfa hay or green manure. The easiest and best bedding is composed of two-thirds corrugated cardboard and one-third peat moss. You can also use cardboard and newspaper.
Be sure to cut cardboard into 1-inch wide strips that are about 3 inches long and tear newspaper into 1-inch strips. Other things that make great bedding include aged horse, rabbit or cow manure, coco peat moss, sphagnum peat moss and fall leaves.
The Secrets Of Sea Minerals To Grow More “Nutritionally-Dense Food” Than You Can Possibly Eat!
In addition to bedding, add two handfuls of sand or soil to help the worms grind up food in their gizzards. Also, add a little bit of ground limestone or wood ash over the bedding. Mix the bedding together and dampen it thoroughly. Add the worms and allow them to settle into their new home for about 3 days before adding any scraps.
Kitchen scraps
When composting with worms, do not feed the worms metal, plastic, or foil. Use only vegetable and fruit scraps, tea bags, crushed eggshells, coffee grounds with filter, stale bread and small pieces of houseplant trimmings. Be sure that all scraps are cut into chunks and add citrus, onion and garlic sparingly. If adding dairy, meat and fish, do so sparingly at first and spread them out well into the bedding. Small or broken chicken bones are also OK but bigger ones won’t break down.
A good method is to collect kitchen scraps in a bucket with a lid and add to the compost every two days or so. Bury scraps in the bedding in a corner of the box and move to a new spot, close to the first one, next time. A small box can accommodate about nine bury sites.
About every 3 to 6 months, you will need to empty the box.
Harvesting for use
Method One
Dump the material in the box on a large piece of plastic under a bright light or in the sun. Make eight small mounds and wait a few minutes for the worms to bury into the mounds — they do this because they are sensitive to light. Use a hand brush and dustpan to lightly brush the top of each mound until you see worms — wait a bit for them to bury some more. Do this over and over. When you finish, you will have a pile of worms ready for new bedding. Once the worms are in their new bedding, what is left is rich compost. Store the compost for a couple of weeks before using in the garden.
Method Two
Place a piece of nylon mesh window screening that is a bit bigger than the size of the box — lay it flat on the surface of the vermicompost. Add fresh bedding on top of the screen and continue to feed kitchen scraps. The hungry worms will penetrate the screen into the new bedding to find the food.
When the top layer is ready for harvest, lift the screen out from the box and set it aside. Empty the box filled with high quality vermicompost. Dump the material that was on top of the screen back into the box and put the screen on top with fresh bedding. Be sure that the screen does not rot. Replace as needed.
Method Three
This is a super easy harvesting method, although you will not get a lot of extra worms. Feed kitchen scraps to your worms for about four months and start a new bed with fresh bedding. To be sure that the new box has enough worms, add a few each time you feed the first box. Once you start feeding the second box, stop feeding the first box. By the time the second box is full, the first box will contain very high quality castings but very few worms.
Tips and tricks:
- There should be no flies or foul smells when composting with worms. However, if this happens you are feeding the worms more than they can consume. Stop feeding the worms and add some more dry bedding and lime. Stir the bin with a hand fork. Repeat the process as long as the smell persists.
- Fruit flies may get into the box and they will not cause any harm; however, too many of them means too much feed. Slow down on the feeding and cover the waste with damp newspaper.
- Your box may also become home to a number of soldier fly maggots or vinegar fly larvae. Although these maggots help with the compost in process, you can add more bedding and lime or even put a piece of bread soaked in milk on the surface. Once the larvae migrate to the bread, take it out and feed it to your chickens — they will love you.
- Keep your wormery in a shady area outside, and if you have cold temps in the winter you should consider moving the wormery to a warmer location such as a garage or shed. You can also insulate the box by adding a layer of straw on top. Surrounding your worm bin with heavy plastic sheeting or pieces of old carpet will also keep your worms warm.
Using the worm compost
Mix the organic compost into the topsoil around your plants. You don’t need much because it is very rich. Use vermicompost to start seedlings by mixing about 25 percent into potting soil for best results. You can also make compost tea by mixing two tablespoons of vermicompost in with a liter of water. Let it sit for one day, shaking once in a while and sprinkle under plants. Be sure not to let vermicompost dry out before using it. Keep a fresh batch brewing all the time to keep your plants healthy and happy.
What vermicomposting tips would you add? Leave your comments in the section below:


